This Took How Long?
September ’15, a guy knocked on the door and asked if I wanted to get an estimate for painting the outside of my house. He said he was a retired schoolteacher, and lived summers in the Northwest, but spent winters here in Arizona. To supplement his income, he said that he paints a few houses while he’s here. Together with his helper, they walked all around the property, looking at everything and pointing and mumbling about a few of the more challenging areas.
Finally, he concluded his inspection and said, “Well, it needs a lot of work, and some places need the drip rail moulding replaced. It’s rotted away in places.” I agreed, and asked how much he would charge to do a really thorough job. He continued, “There’s some places that need lots of scraping too, and some caulk. It needs a lot to make it look nice.” “OK,” I said, “How much?” He paused and thought, and then said, “Well, it’s gonna take us a day to power wash the whole thing, and start the prep. The next day, we will finish the prep, and caulk. Then a day to spray it. I think we can knock it out in 3 days, maybe 4, if we run into any problems.
“I see,” I replied, “How much do you think it will cost?” “We use good paint, you know, not the cheap stuff. Probably need 15 gallons,” he offered. So, by this time, I figured I’d just let him talk, and he’d get around to cost eventually. He continued to describe how they would mask the windows, put down drop cloths, clean up after themselves, and do a great job. Then, finally, the part I was waiting for. “$5500 to do it all. It will look beautiful. And, we can start this week if you like and be done by Saturday!”

“I’ll have to think about it. Thanks for taking your time to give me an estimate. Give me your card, and I’ll call you if I decide to have you do it.” “Alright,” he replied, “but if we get busy, I may not be able to fit you in this year!” “Thanks, I’ll call ya.”
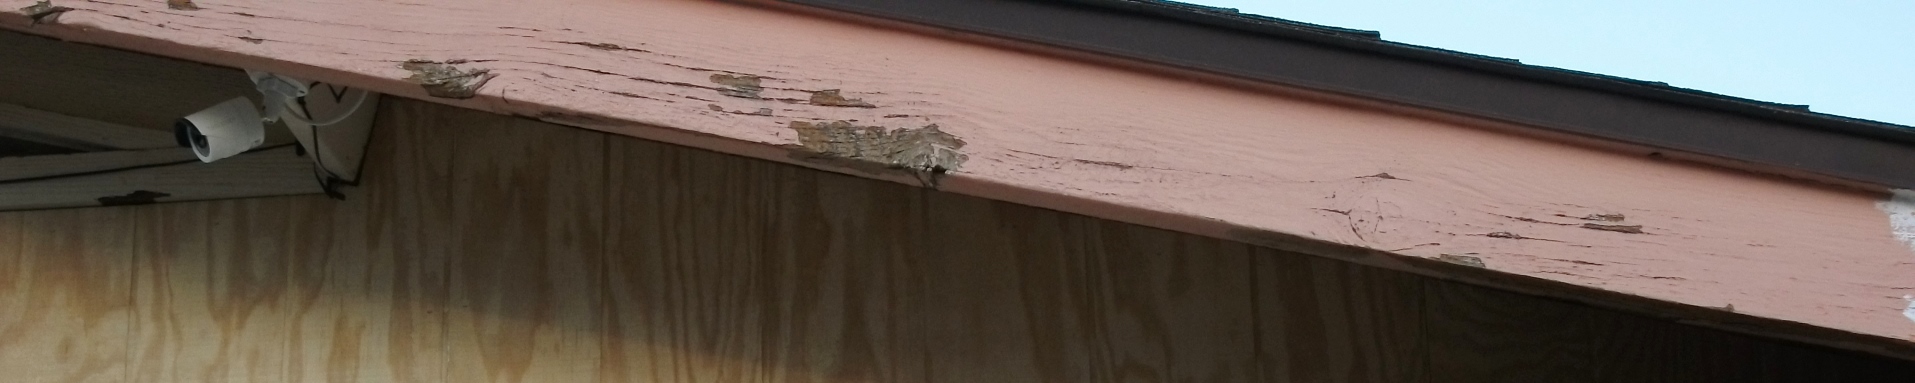
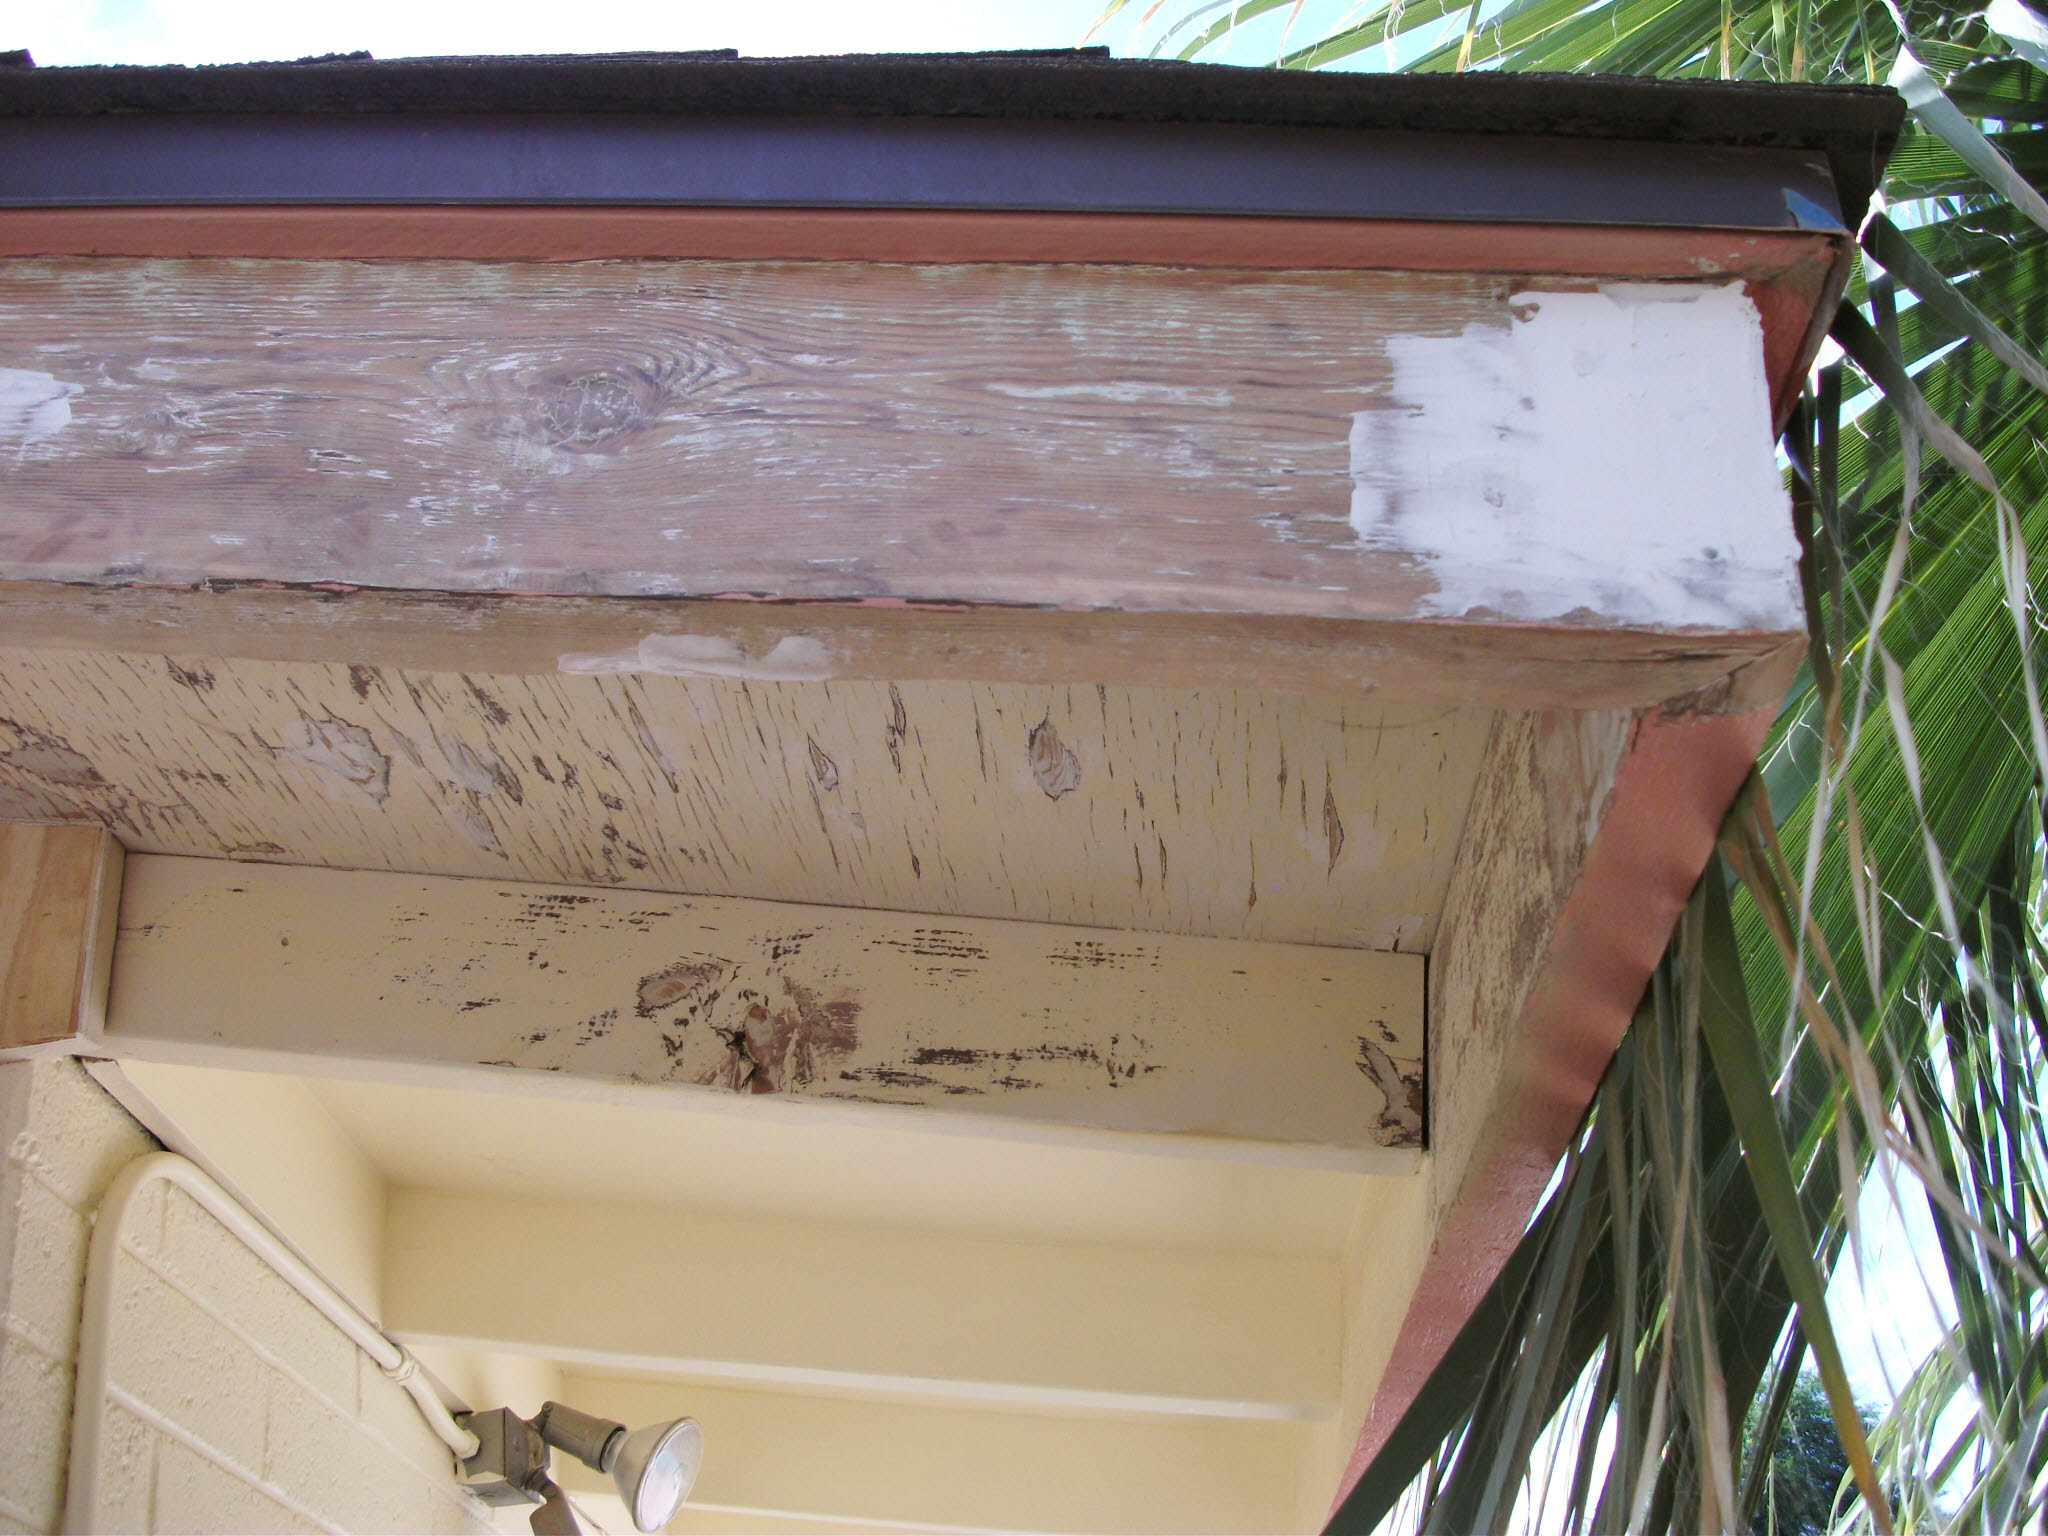
So, that started me thinking about maybe fixing up a few of the really bad spots, and maybe repainting all the fascia boards, because they had taken the worst beating in the Arizona sun. By Thanksgiving, I had resolved to start on the back fascia boards first, and I assembled a few short ladders, my rolling cart, and some scrapers, putty knives, and a sander. I climbed up and got up-close and personal with the fascia at the edge of the back patio. Immediately, I knew I was in for a chore. The drip rail moulding was way worse than I first imagined, now that I was poking at it with the putty knife it crumbled into dust in a lot of places and the fascia itself was mostly covered in cracked and really rough old paint. As I began to scrape the worst areas, large chunks of dried out paint flew off taking a bit of sun dried old wood with it in places. It was rough going, and very slow. In four hours, I had only done about 5 feet of fascia, and I was already worn out.
I decided to see if my angle grinder, equipped with a nice 80 grit grinding disk might speed things up a bit. But, first, before making sanding dust, I had to run to the Home Depot for a couple of lead test kits. While I was there, I bought a few extra grinding disks just in case. I tested the chips I had already scraped off, the remaining surface of the fascia, and just for good measure, some sample sanding dust I had created with my little orbital sander that has a catch bag. Luckily, none of these showed any lead. So, I fired up my 40 year old WEN brand angle grinder and set to work. It chewed through the paint, with its internal gears screaming for mercy, as I ruthlessly forced it back and forth across the board face. Within 15 minutes, I had learned a whole lot of things.
First, the wood under the paint was like balsa in places, dry and soft. Next, the angle grinder got too hot to hold really quickly. Gloves! The friction of grinding heats and melts the paint, which then clogs the disk in minutes. You have to keep a light touch and move back and forth fast so you don’t overheat any one area. That grinder gets really heavy fast when you hold it out and up away from you and then try to put a little pressure on it as you work. In a short time, I was sweaty, my arms hurt, and I was covered in dust. That’s me in the first picture, dressed for work. The patio fascia is 26 feet long and 7 1/2″ wide. I managed to get about a third of it respectably clean before I was completely worn out. The angle grinder smelled like old varnish that’s been in a house fire combined with that signature “burning insulation” smell.
The next day, my back and arms were screaming for mercy, and so I decided to visit the Home Depot early, to get some supplies. The first thing I put into the cart was a brand new RIDGID brand angle grinder. The 7 inch 8000 RPM one with the twist handle and the 15 amp motor. I also bought a couple more 7″ 80 grit disks. Additionally, I added extra paint trays, a 7″ roller handle an a bunch of deep nap rollers, foam “brushes”, some of those flat plastic paint can “pourer” spouts that snap onto the can rim (indispensable for a clean job), an aluminum roller extension handle, a big canvass drop cloth, some plastic sheeting, red “stucco” tape, blue masking tape, and a few 80 grit hook & loop disks for my DeWALT 5″ Random Orbital Sander, in case it might be helpful in getting these fascia boards prepped.
By the time I got home, I couldn’t wait to fire up my new hot-rod angle grinder, so I un-boxed it and quickly discovered that, although it came with a really nice grinding wheel and guard, it did NOT come with a backing pad for my newly purchased grinding disks. The project screeched to a halt.
Another trip to the Home Depot proved fruitless, as they didn’t stock such a thing (I found out later that some stores actually do have it) and so when I got home, I ordered a Bosch BP700 7-Inch Rubber Backing Pad with Lock Nut from Amazon Prime. Meanwhile, I decided to do some hand scraping and chipping on that patio fascia, just to chip off the worst and most cracked areas of old paint. Well, that’s when the first of many setbacks surfaced. As I proceeded down the fascia, the scraping revealed more and more underlying hidden damage, especially near the top of the fascia under the roof drip rail. There were places that had turned into powdery, crumbly perforated “cardboard” where years of repeated water intrusion had just rotted the wood away behind the surface. Near the West end of the fascia, I could just flip out large chunks of rot with just my putty knife.
So, the first “big decision” had to be made and implemented. I proceeded to carefully remove all the nails holding the fascia to both the ends of the rafters and those in the corners at the ends, and then carefully pry the fascia boards down and out from under the roof sheathing. Needless to say, I deformed some sections of the metal drip rail, and tore a few nails down through the roof sheathing, but eventually and slowly, I was able to get all 26 feet of partially rotted fascia off the patio roof edge and onto the ground. I shuddered to think where else I might end up finding similar or even worse damage. Once I got the fascia down, I could better inspect the roof’s edge from above and below, and was thankful to find that the roof asphalt and the underlayment were still quite sound, with just a little bit of wood rot at the very edge of the sheathing. I resolved to hit the lumber yard the next day with a sample of the old fascia, since it measured 7 1/2″ X 1 3/4″ which in today’s “standard” lumber sizes, doesn’t exist.
As soon as the word “custom” is uttered, the price goes up exponentially. Three different lumber yards said that they would be able to order odd sized fascia boards, but that it would be a special order from the mill, would require full payment in advance, and would not be returnable in any case. I returned home dejected and empty handed. I decided to let that project wait, and move on to other areas and see what other repairs might be discovered as I moved along in my prep job, so that I had a better picture of what other “parts” I might need.
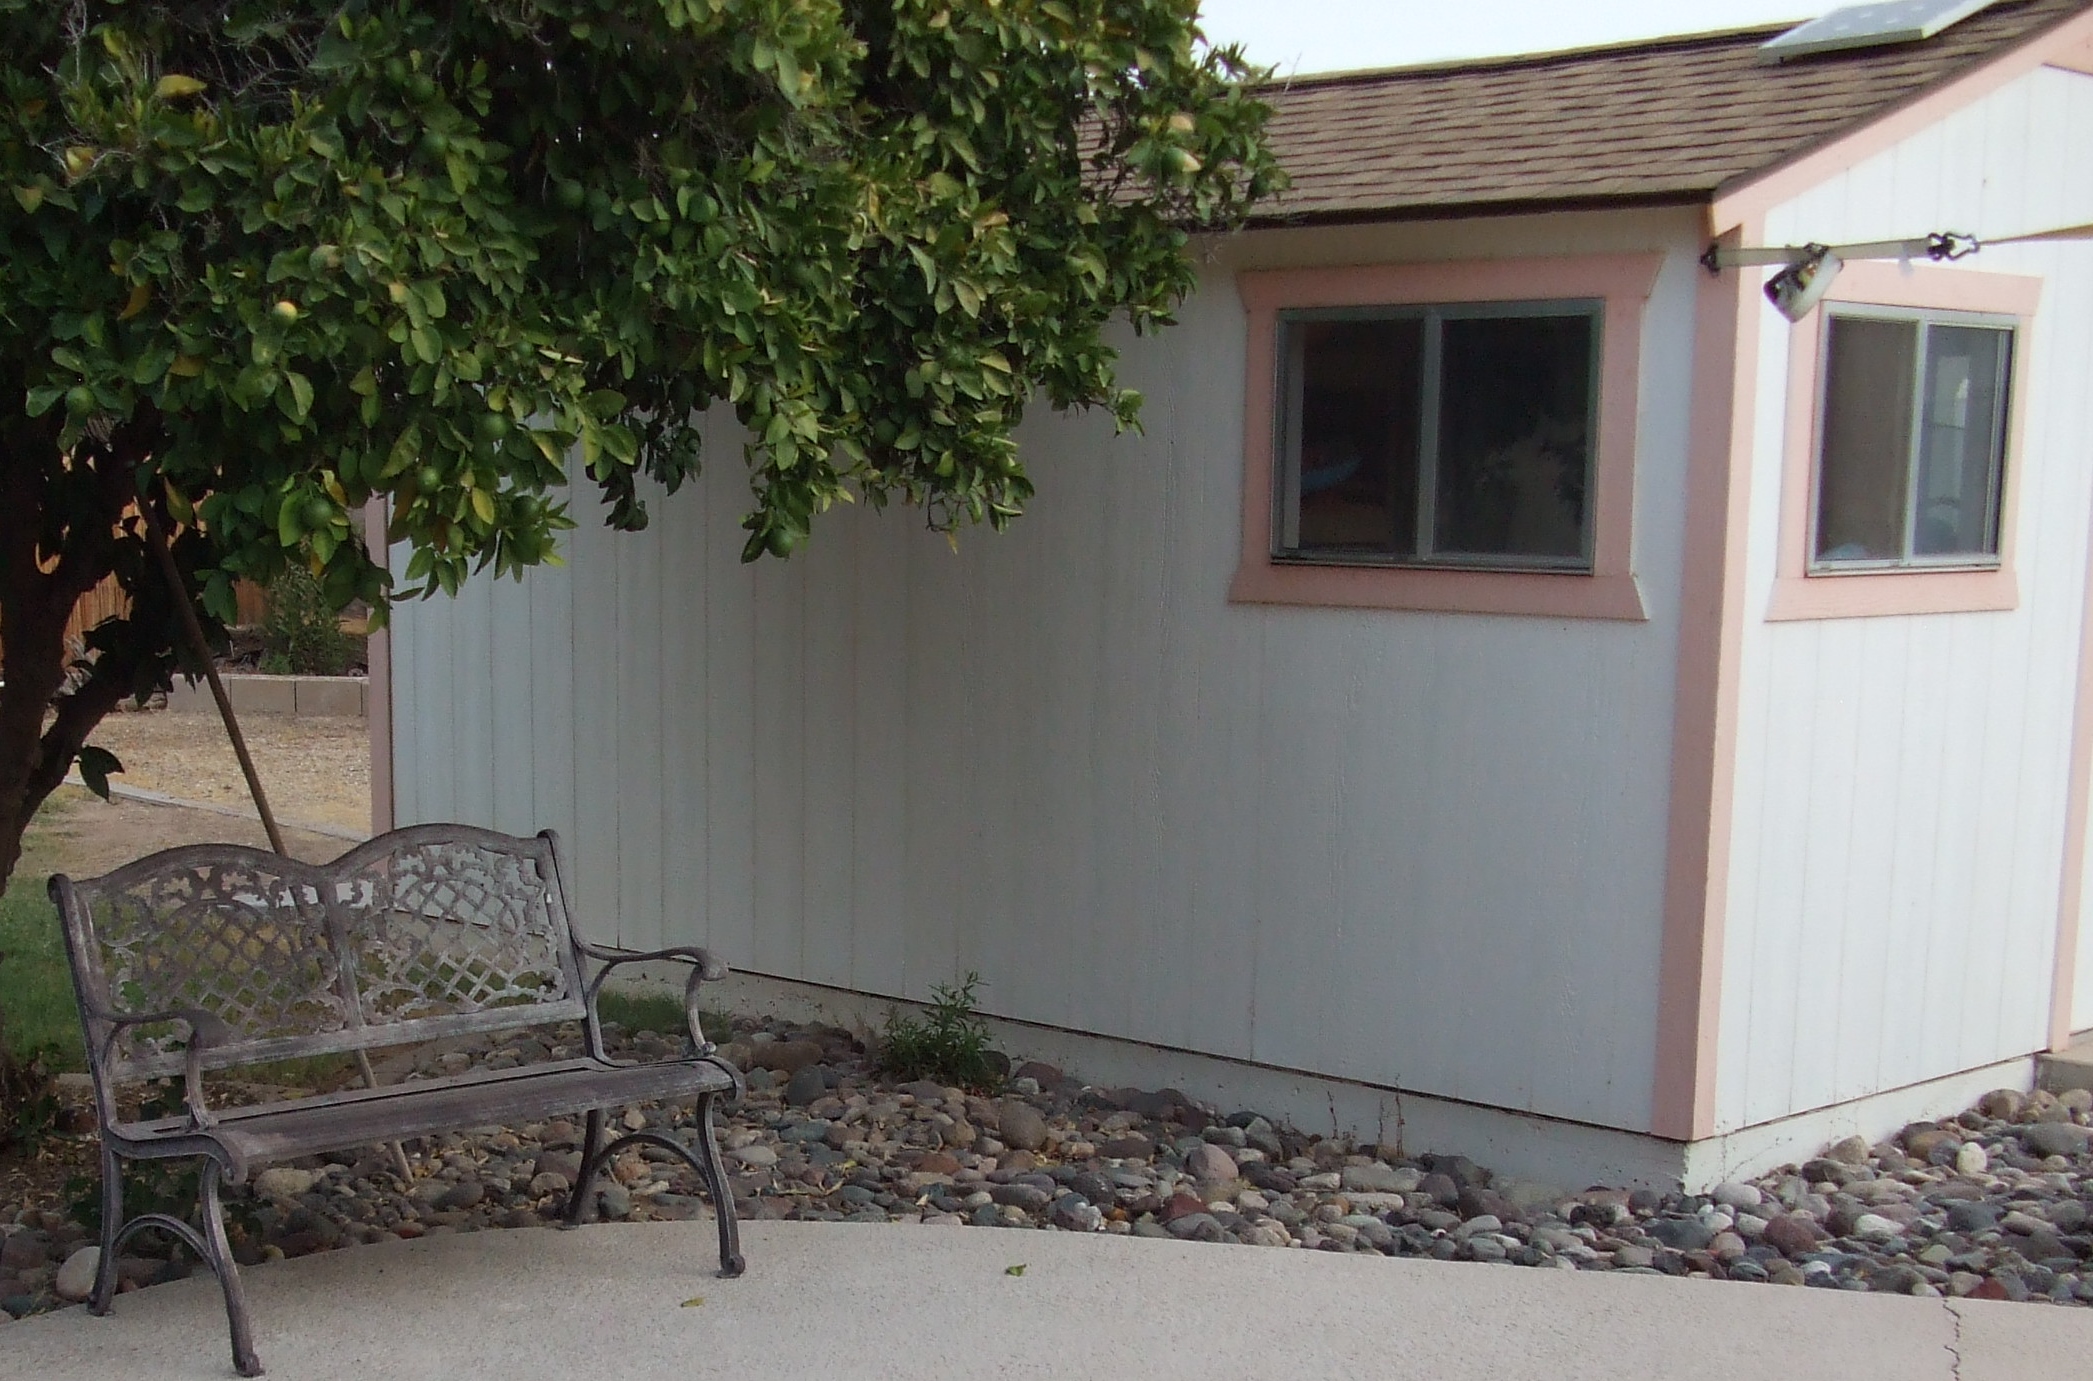
Even though I intended to start on the rest of the fascia on the back of the house the next day, another pressing project had to take priority, and I didn’t get right back to it as planned. Frustrated that the first push towards a freshly painted house had already been derailed, I decided that my 10′ X 16′ Tough Shed storage shed would be a great canvass on which to audition my new house colors; Cream Puff for the body color, and Copper Leaf for the trim. Since the shed needed relatively little prep work, it would get me out of the gate with a quick success. So, two days later, I began to scrape and sand the few areas that really needed it, and fix a place under the eave where the wood had come loose. For the next few days, I applied the orbital sander where the paint had begun to crack, and scrape, chip and sand some of the door and window frames that had begun to flake on the Southern exposure. The West end was the worst, and I had to get down to bare wood in some areas of the siding. I also discovered quite a few places and seams where a bead of caulk would be both esthetic and functional.
With the sanding and scraping all finished, and the eave repaired, I purchased some white siliconized acrylic caulk, settling on DAP Dynaflex 230 100% Waterproof Window, Door, & Trim sealant as a good balance between durability and cost. Now it was time to decide who would supply the paint. A couple of years ago when the big storm blew down the huge tree that wrecked the front patio roof, the contractor that repaired it recommended Dunn-Edwards Spartashield “eggshell” as the paint that he swore by for Arizona desert climates. I had picked the colors at that time because they were somewhat more vibrant versions of the existing house colors, which we liked very much. Since his repair job looked so perfect, I used the same paint codes and headed to my local Dunn-Edwards paint store, where I bought a gallon of each color and, on the recommendation of the salesman, a gallon of their Ultra-Grip Premium primer.
Returning to the job, I caulked every exposed seam on the shed, and waited overnight for the caulk to fully set. The next day, I carefully primed all the rough and bare areas, and again, let it dry overnight. The following day, accompanied by my terrific helper (a.k.a. Wife) we painted the body color of the entire shed, with her cutting in around everything and me rolling on the paint with a Purdy Golden Eagle 1/2″ nap roller on my premium quality roller frame and the aluminum extension pole for balance. Again, overnight drying, and then we used a few short nap and foam 3″ rollers to paint all the trim in the Copper Leaf color. Some places on the trim required a second coat, but the Dunn-Edwards Spartashield re-coated beautifully in just an hour or so in our warm and dry climate.
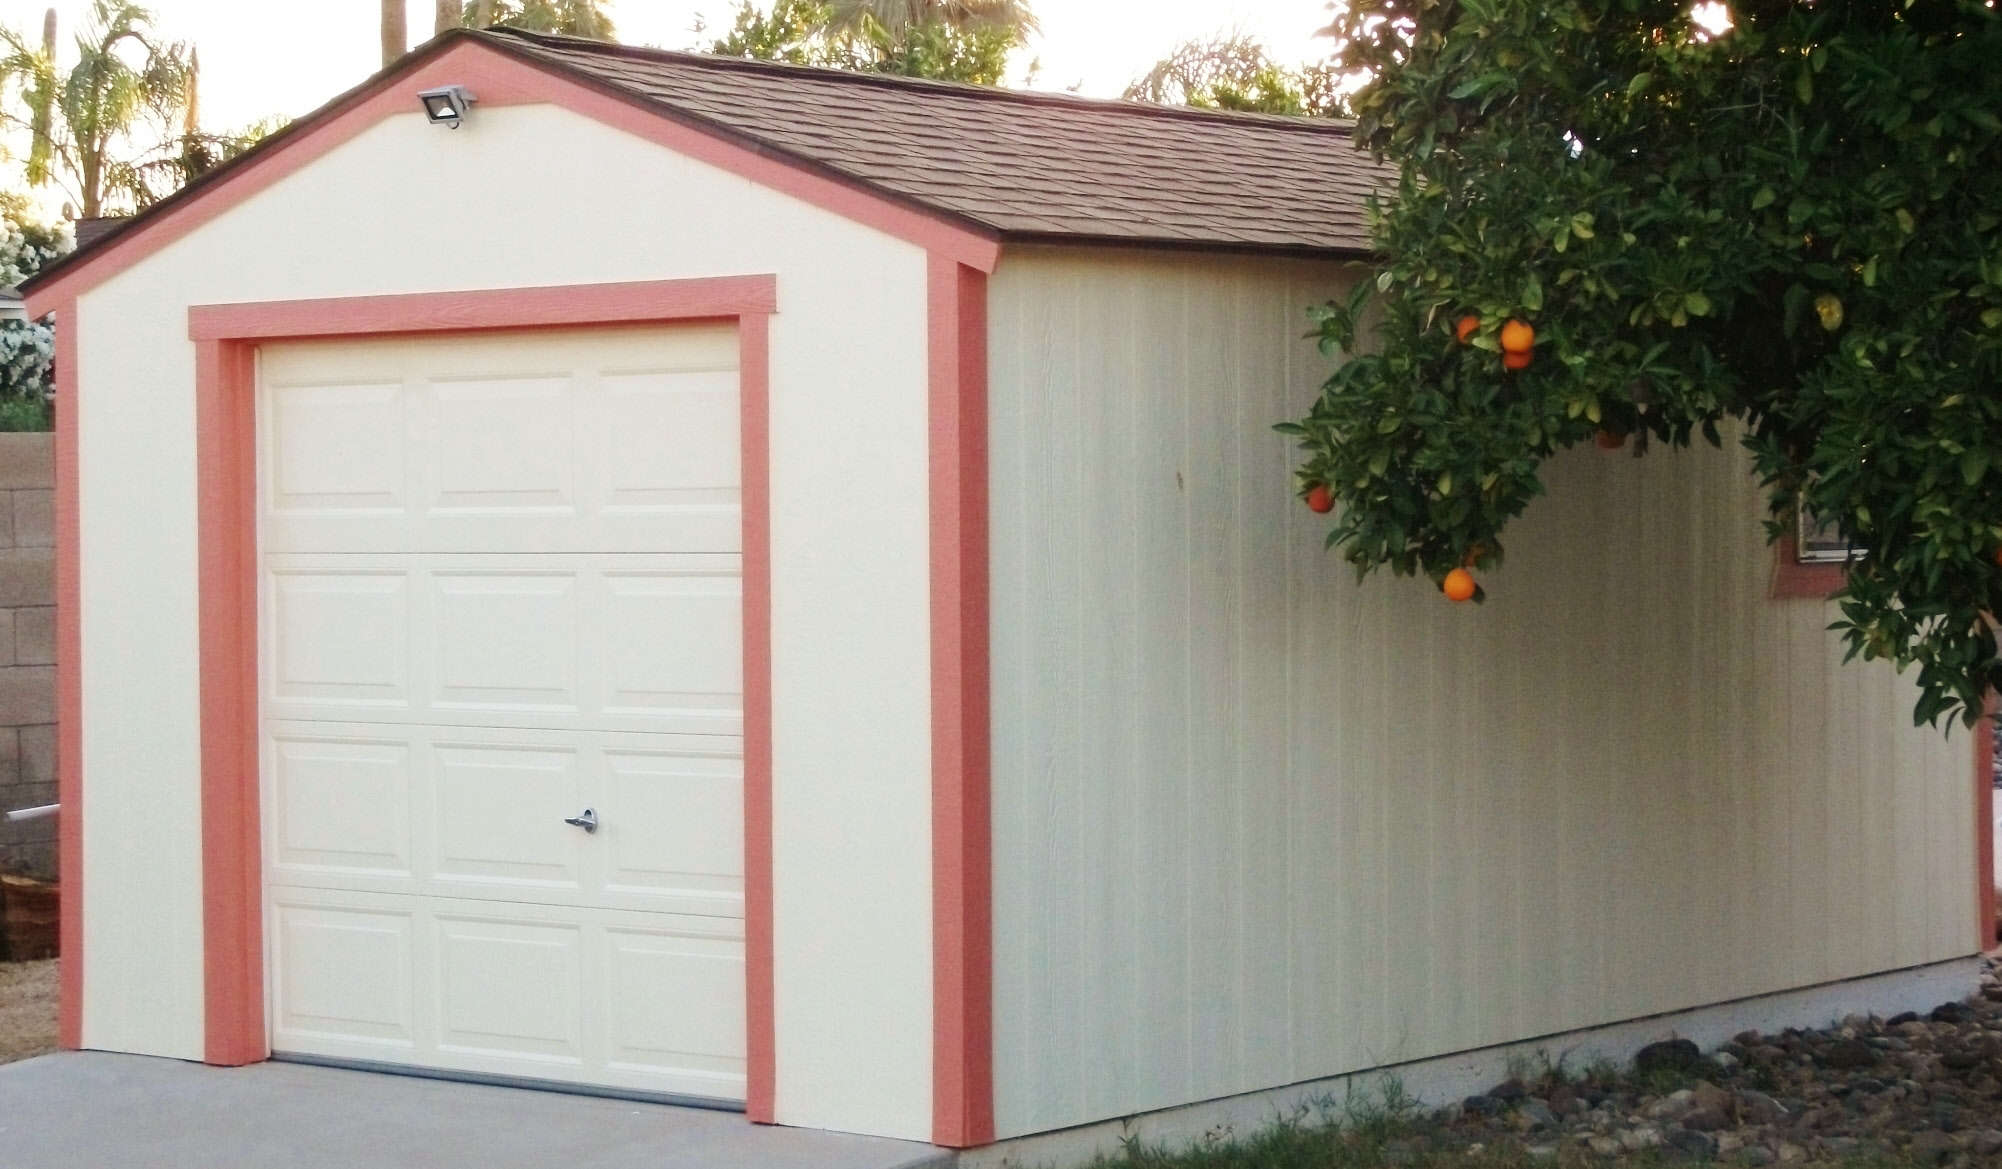
The updated colors “popped” and confirmed that they would be ideal for the house also.
Armed with a victory, I turned my attention back to the remaining fascia boards and what I knew was going to be a tough prep job.
I moved my attention to the length adjacent to the now-missing patio fascia on the East end of the back of the house, and by now, the rubber backing pad for the angle grinder had arrived and been installed along with a fresh 80 grit disk. Wearing full personal protective gear, I climbed up on my Little Giant Safety Step – 4 step ladder, and pulled the trigger on the new grinder. Whoa Nellie! The 8000 rpm disk bit into the old cracked paint like a grizzly into a fresh caught salmon. But, despite a careful light touch, the disk soon clogged with melted paint. At first, I tried laying the grinder on the work cart upside-down, cranking it up, and letting it cut into a hand-held piece of scrap steel to “cut” the old paint out of the grit, but that was only marginally effective. Mostly, it just made a shower of sparks, and a burning smell. So, I found that if I moved the disk rapidly back and forth across the work-face, heat buildup was controllable, and I could sand about 6 feet of fascia before the disk became so clogged as to be useless. Also, if I didn’t keep good control, the grinder would instantly cup the face of the board, leaving obvious semi-circular sanding gouges. Meanwhile, I began to realize just how difficult it was to hold that grinder up and keep control of it, move it rapidly, and not let it gouge, as my arms and shoulders began to burn with exhaustion. Changing the disk was a welcome break. A few times, the disk would melt a big patch of paint, gain instant traction, and threaten to pull me off the ladder.
As I worked, I realized that sanding dust was able to sneak into the anti-fogging vents of my safety goggles. Ultimately, I took masking tape and covered them, but that meant that the goggles would fog up whenever I exerted myself a little and began to sweat. Additionally, the part of the goggles that normally sat on the bridge of my nose was being held up by interference with the top of the respirator, allowing an additional avenue for dust to get into my eyes. I solved that by gluing soft foam weatherstrip around the part of the goggles that sat against my face, and it conformed enough to provide a good seal. But on warm days, I could only work about 10 minutes at a time before the goggles hopelessly fogged, blocking all chance of seeing what I was doing. In the long run, that ended up being a blessing, because it forced me to take more frequent breaks and rest my weary arms. Progress was relatively quick, though, allowing me to sand off the layers of paint from around 15 – 20 feet of fascia before I couldn’t raise the grinder any more with any hope of good control with rubber arms.
Once that point was reached, I turned to other jobs that I could still do. The corners of the fascia everywhere on the house typically showed the worst weather and water damage.
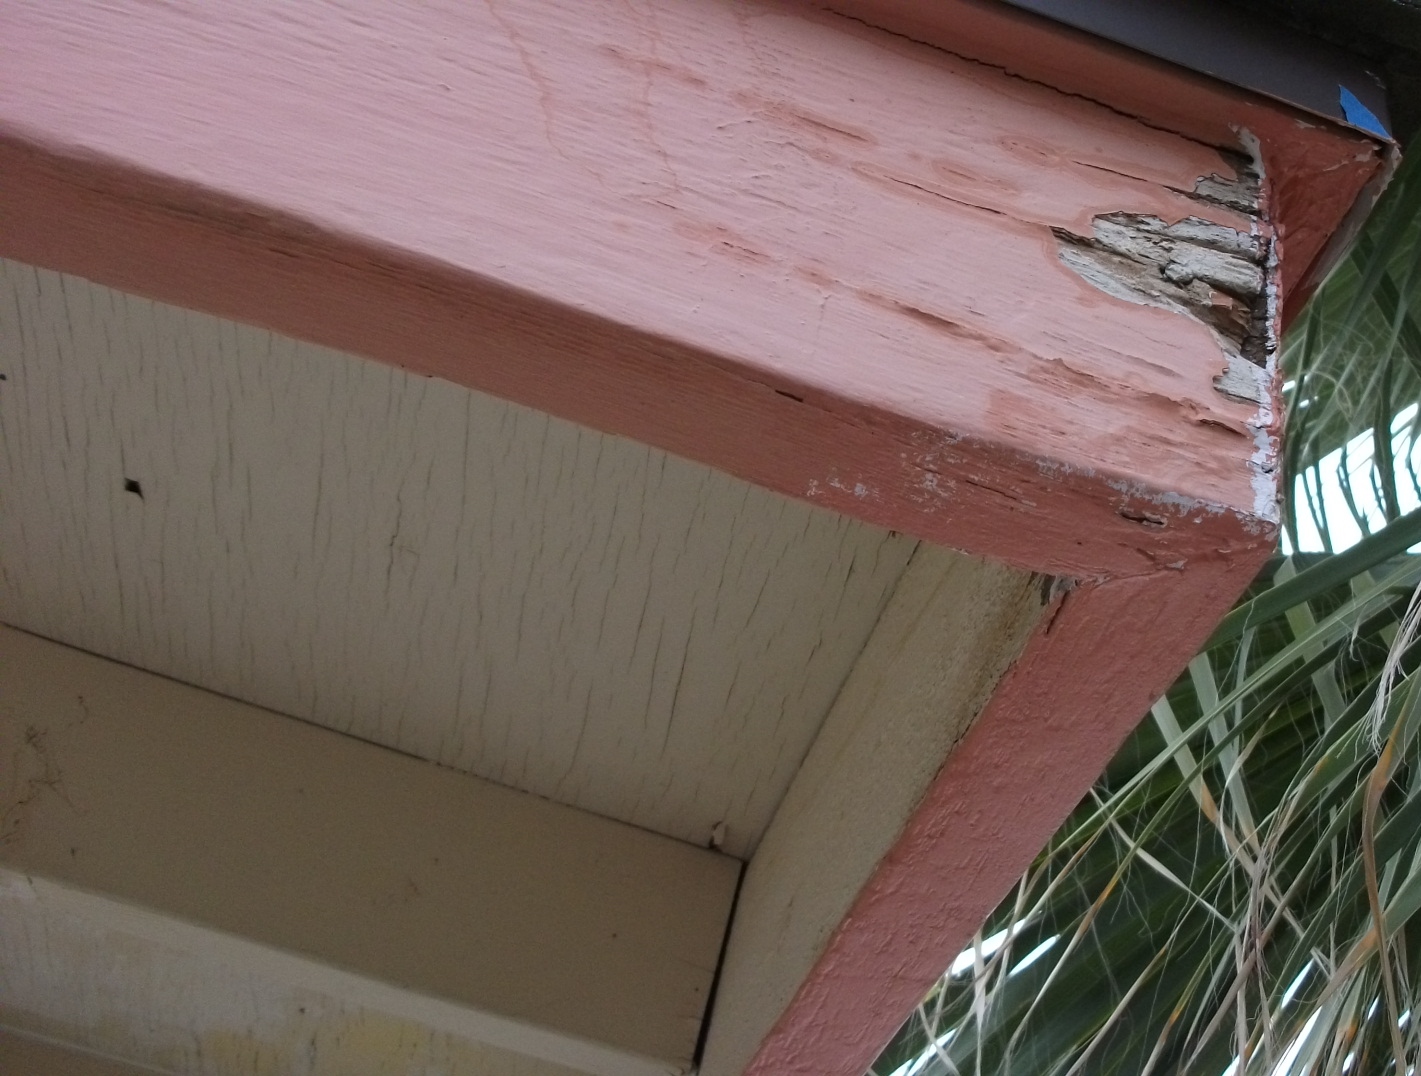
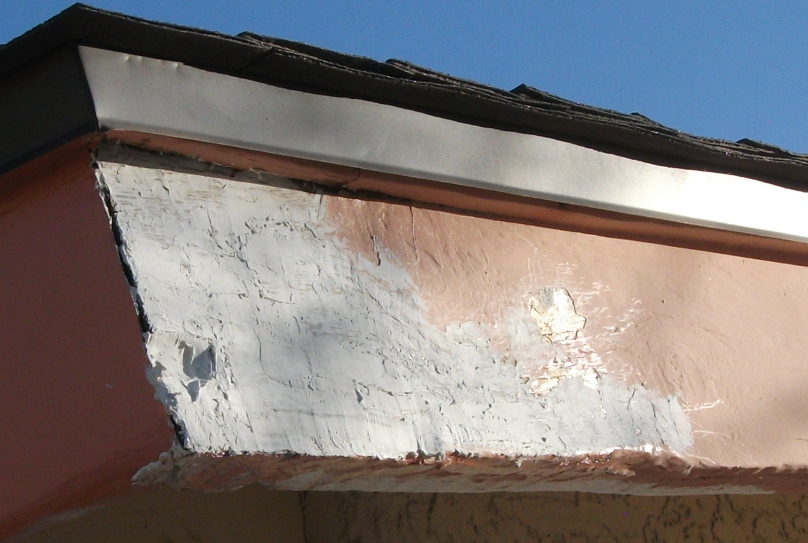
When I was too tired to hold the grinder up, I used various hand tools to scrape and pick all the old putty and caulk out of the damaged corners. The remaining wood was very soft in places, so once I had the old stuff cleaned out, I applied a goodly amount of PC Products Water Based Wood Hardener which, after drying overnight and getting a second application, did a great job rescuing the remaining softened wood. Then, using the orbital sander, I rough sanded the newly hardened wood, and applied a thin first layer of MH Ready Patch to begin filling in the voids. Each layer was allowed to harden overnight, and the next layer added about 1/4″ maximum at a time to build up the corners.
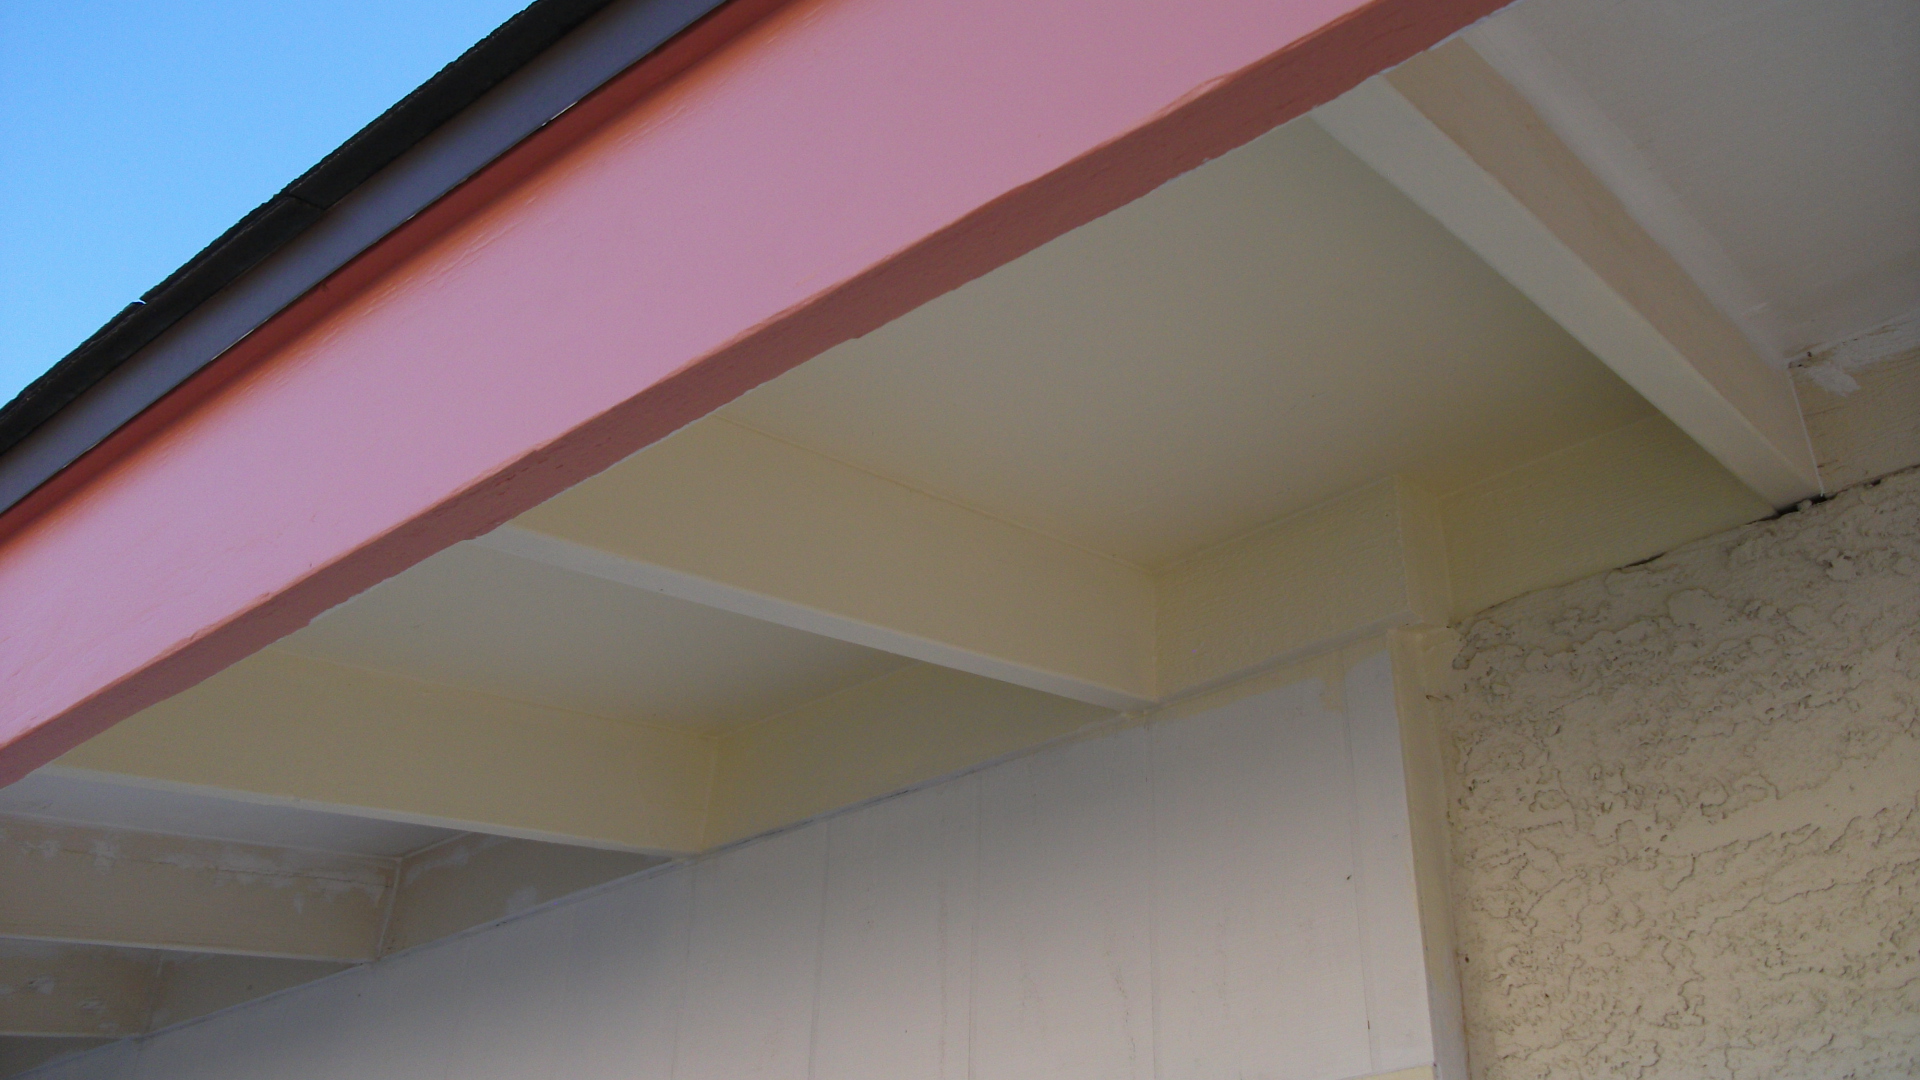
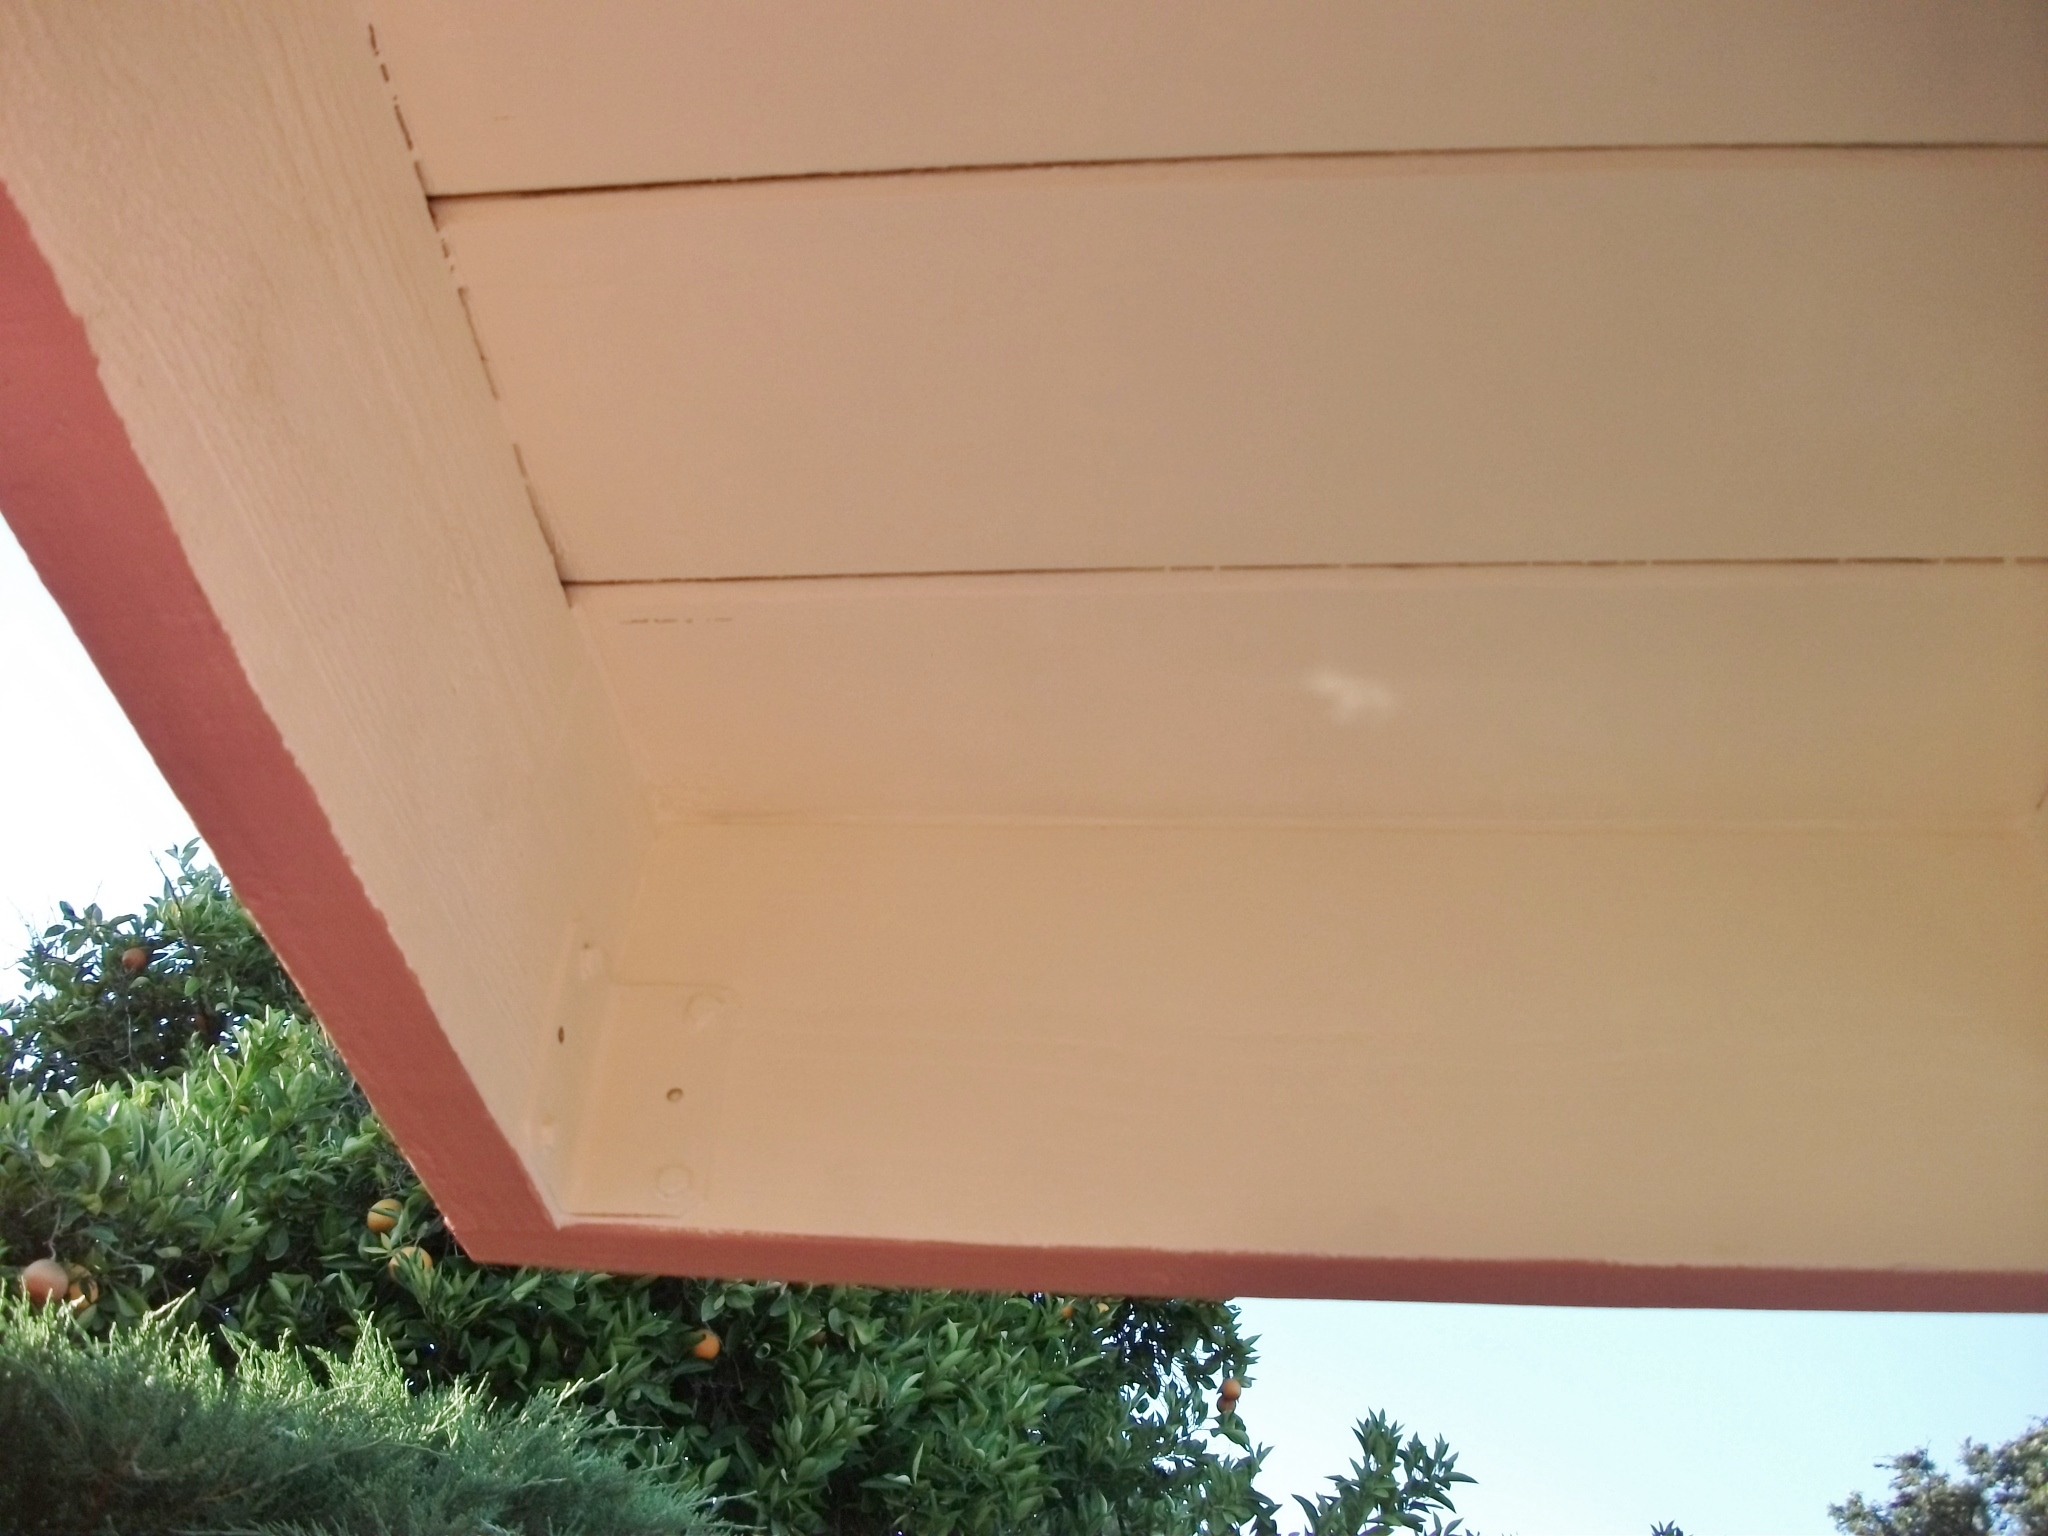
In 4 or 5 applications, the MH Ready Patch was built up proud of the surface and it was an easy job to sand it smooth using the orbital and a 120 grit disk. (The accompanying picture was actually taken later in the whole house painting process, so it also shows a freshly sanded fascia board face and an already sanded “box” under the eaves that will be detailed later in the story.) So, every day the weather was nice, I alternately scraped and sanded fascia, and built up the corners.
After I stripped an area with the angle grinder, I revisited it with the orbital to minimize the sanding marks and occasional cupping. At this point, I was just prepping the face and the bottom edge of the fascia. After sanding, I blew it all off with compressed air, and then wiped it with a damp towel.
Now it was mostly down to bare wood mixed with areas where the old paint was really sound, so I carefully went along the fascia and filled in all of the rough places, low spots, nail holes, and remaining sanding marks with a patchwork application of MH Ready Patch, forcing into the surface and scraping it level with a variety of different width putty knives.
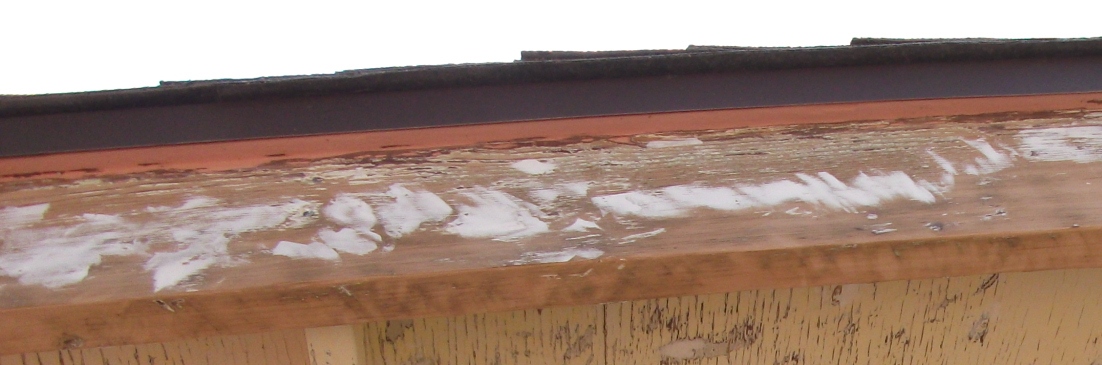
Allowing that to dry overnight, I applied a roller coat of the Ultra-Grip Primer, and allowed it overnight to bond and dry. The next day, the primer allowed me to see the smaller imperfections that still needed to be evened out, so I applied a second round of MH Ready Patch on the remaining imperfections and, again, allowed it to harden fully. Once it had set, I switched to a 120 grit pad on the 5″ orbital and lightly sanded the puttied areas smooth, wiped it all down with a damp cloth, and primed it for the final time. The next day, I rolled on a coat of the trim color, waited a few hours, and re-coated it in most places to insure complete coverage. This was the result;
When all of the fascia on the back of the house was finished, I turned the corner to the West (garage) side of the house and began the whole process over again on the west fascia boards. Scrape and chip the worst loose stuff, strip with the angle grinder, smooth with the orbital sander, putty, sand with 120 grit, prime, putty again, sand again, prime again, and finally color coat.

Originally, all of the wood parts of the house walls (above the block on the ends of the house and above the brick all along the front) was board and batten. Shortly after we moved in, we had all the boards and battens on the front of the house torn off and had the front wall covered with stucco. But, some of the original board and batten siding was still left up in the eaves on both ends of the house, and it was badly cracked and chipped. Since I was already working on the garage end of the house and had started the fascia there, I decided to also start prepping the board and batten. But, I soon realized that it was fruitless. The underlying wood was just too deteriorated and the paint was in terrible shape. Additionally, there was an old thin plywood strip about 15″ high, covering the header over the garage door, and it had started to delaminate. So, I ripped off all of the battens and the plywood on the header and proceeded to replace them with new embossed plywood siding made to look like tongue and groove on 8″ centers. Soon, I realized that this was not a one-person job, and again enlisted the help of my capable assistant / wife.
We hauled out the table saw, work carts, skill saw, saw guides, and numerous rulers, tape measures, and a box of lumber pencils and started measuring and cutting. Each piece was custom fitted into place and power stapled to the underlying wood after both that wood and the back of the new plywood were primered with Ultra-Grip Primer.
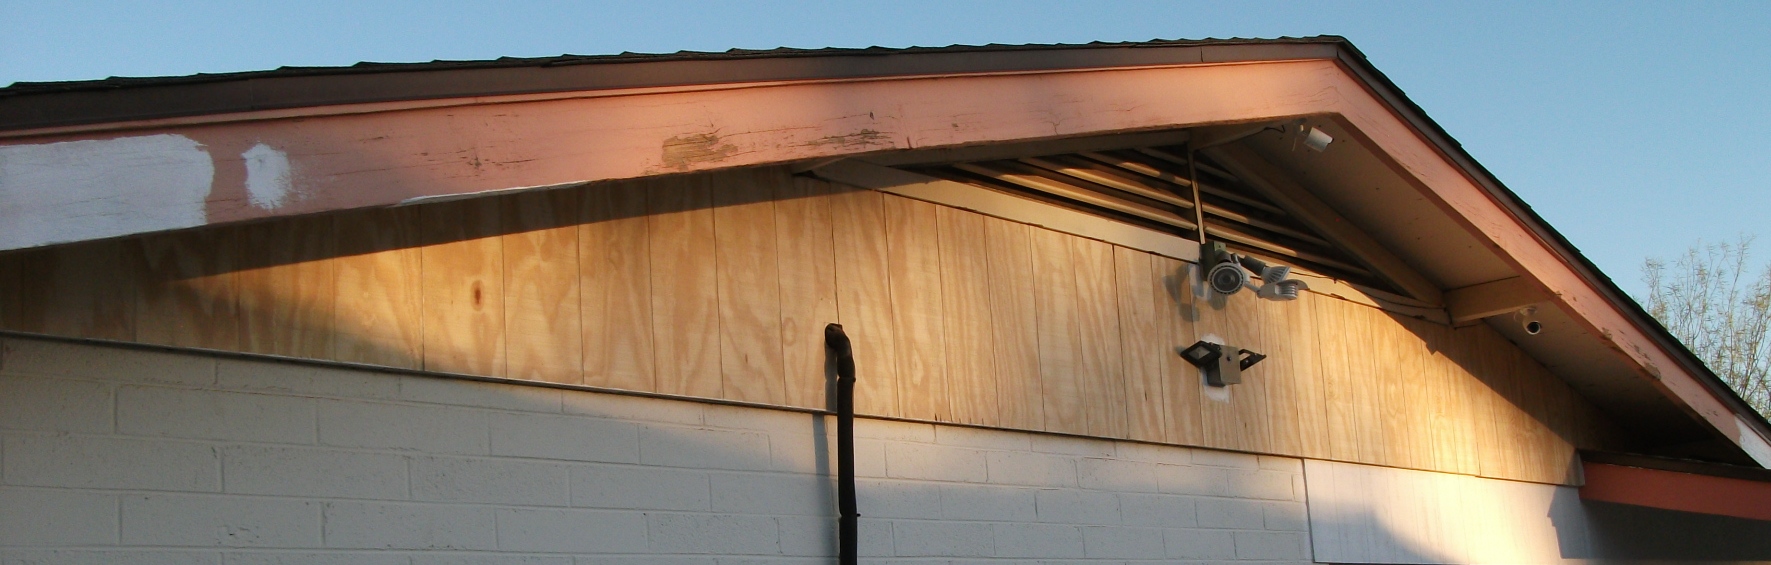
Even before the front of it was primed, we could see that this was going to be a vast improvement in both look and function. As soon as it was all installed, I primed all the faces, and then caulked all the seams in anticipation of the color coat to come later. While I was up on the ladder in the middle, I also scraped the galvanized metal gable vent, which was peeling rather badly in places. At this time, I didn’t really know what I wanted to do to refinish it, thinking that a new coat of latex paint, even with Ultra-Grip Primer under it wouldn’t stick well.
Having done all the steps to prepare the outside of all the fascia, even at the peak of the gable which was a challenge due to the height, I just left it primed for now and began to pay some attention to the inside surface of the fascia boards. Although the paint on them wasn’t as cracked and peeled as the outside, the surface was still very rough with lots of chalking in many places. Again, I suited up and broke out the 7″ angle grinder and began to strip paint. Now the way the house was originally colored, the insides of the fascia boards were all painted body color, and so, for the first time, I was stripping off layers of the original avocado green from 1971 that was topped with the cream color that we had done in 1993 or so. This old paint instantly clogged the grinding disk, no matter how light a touch or how lightly or quickly I played the grinder over the surface. I couldn’t do 18″ of the fascia before the disk was hopelessly clogged with melted paint. I decided that I would just buy a bulk package of disks and change them as they clogged, but I only had a few more in stock for now, and wanted to make some headway while the weather was good and I waited for my bulk disk order to arrive from Amazon. So, I climbed back up the ladder and decided to use brute force. I figured as the disk clogged, I would just apply more pressure and wear the paint off if I had to, and see what happens.
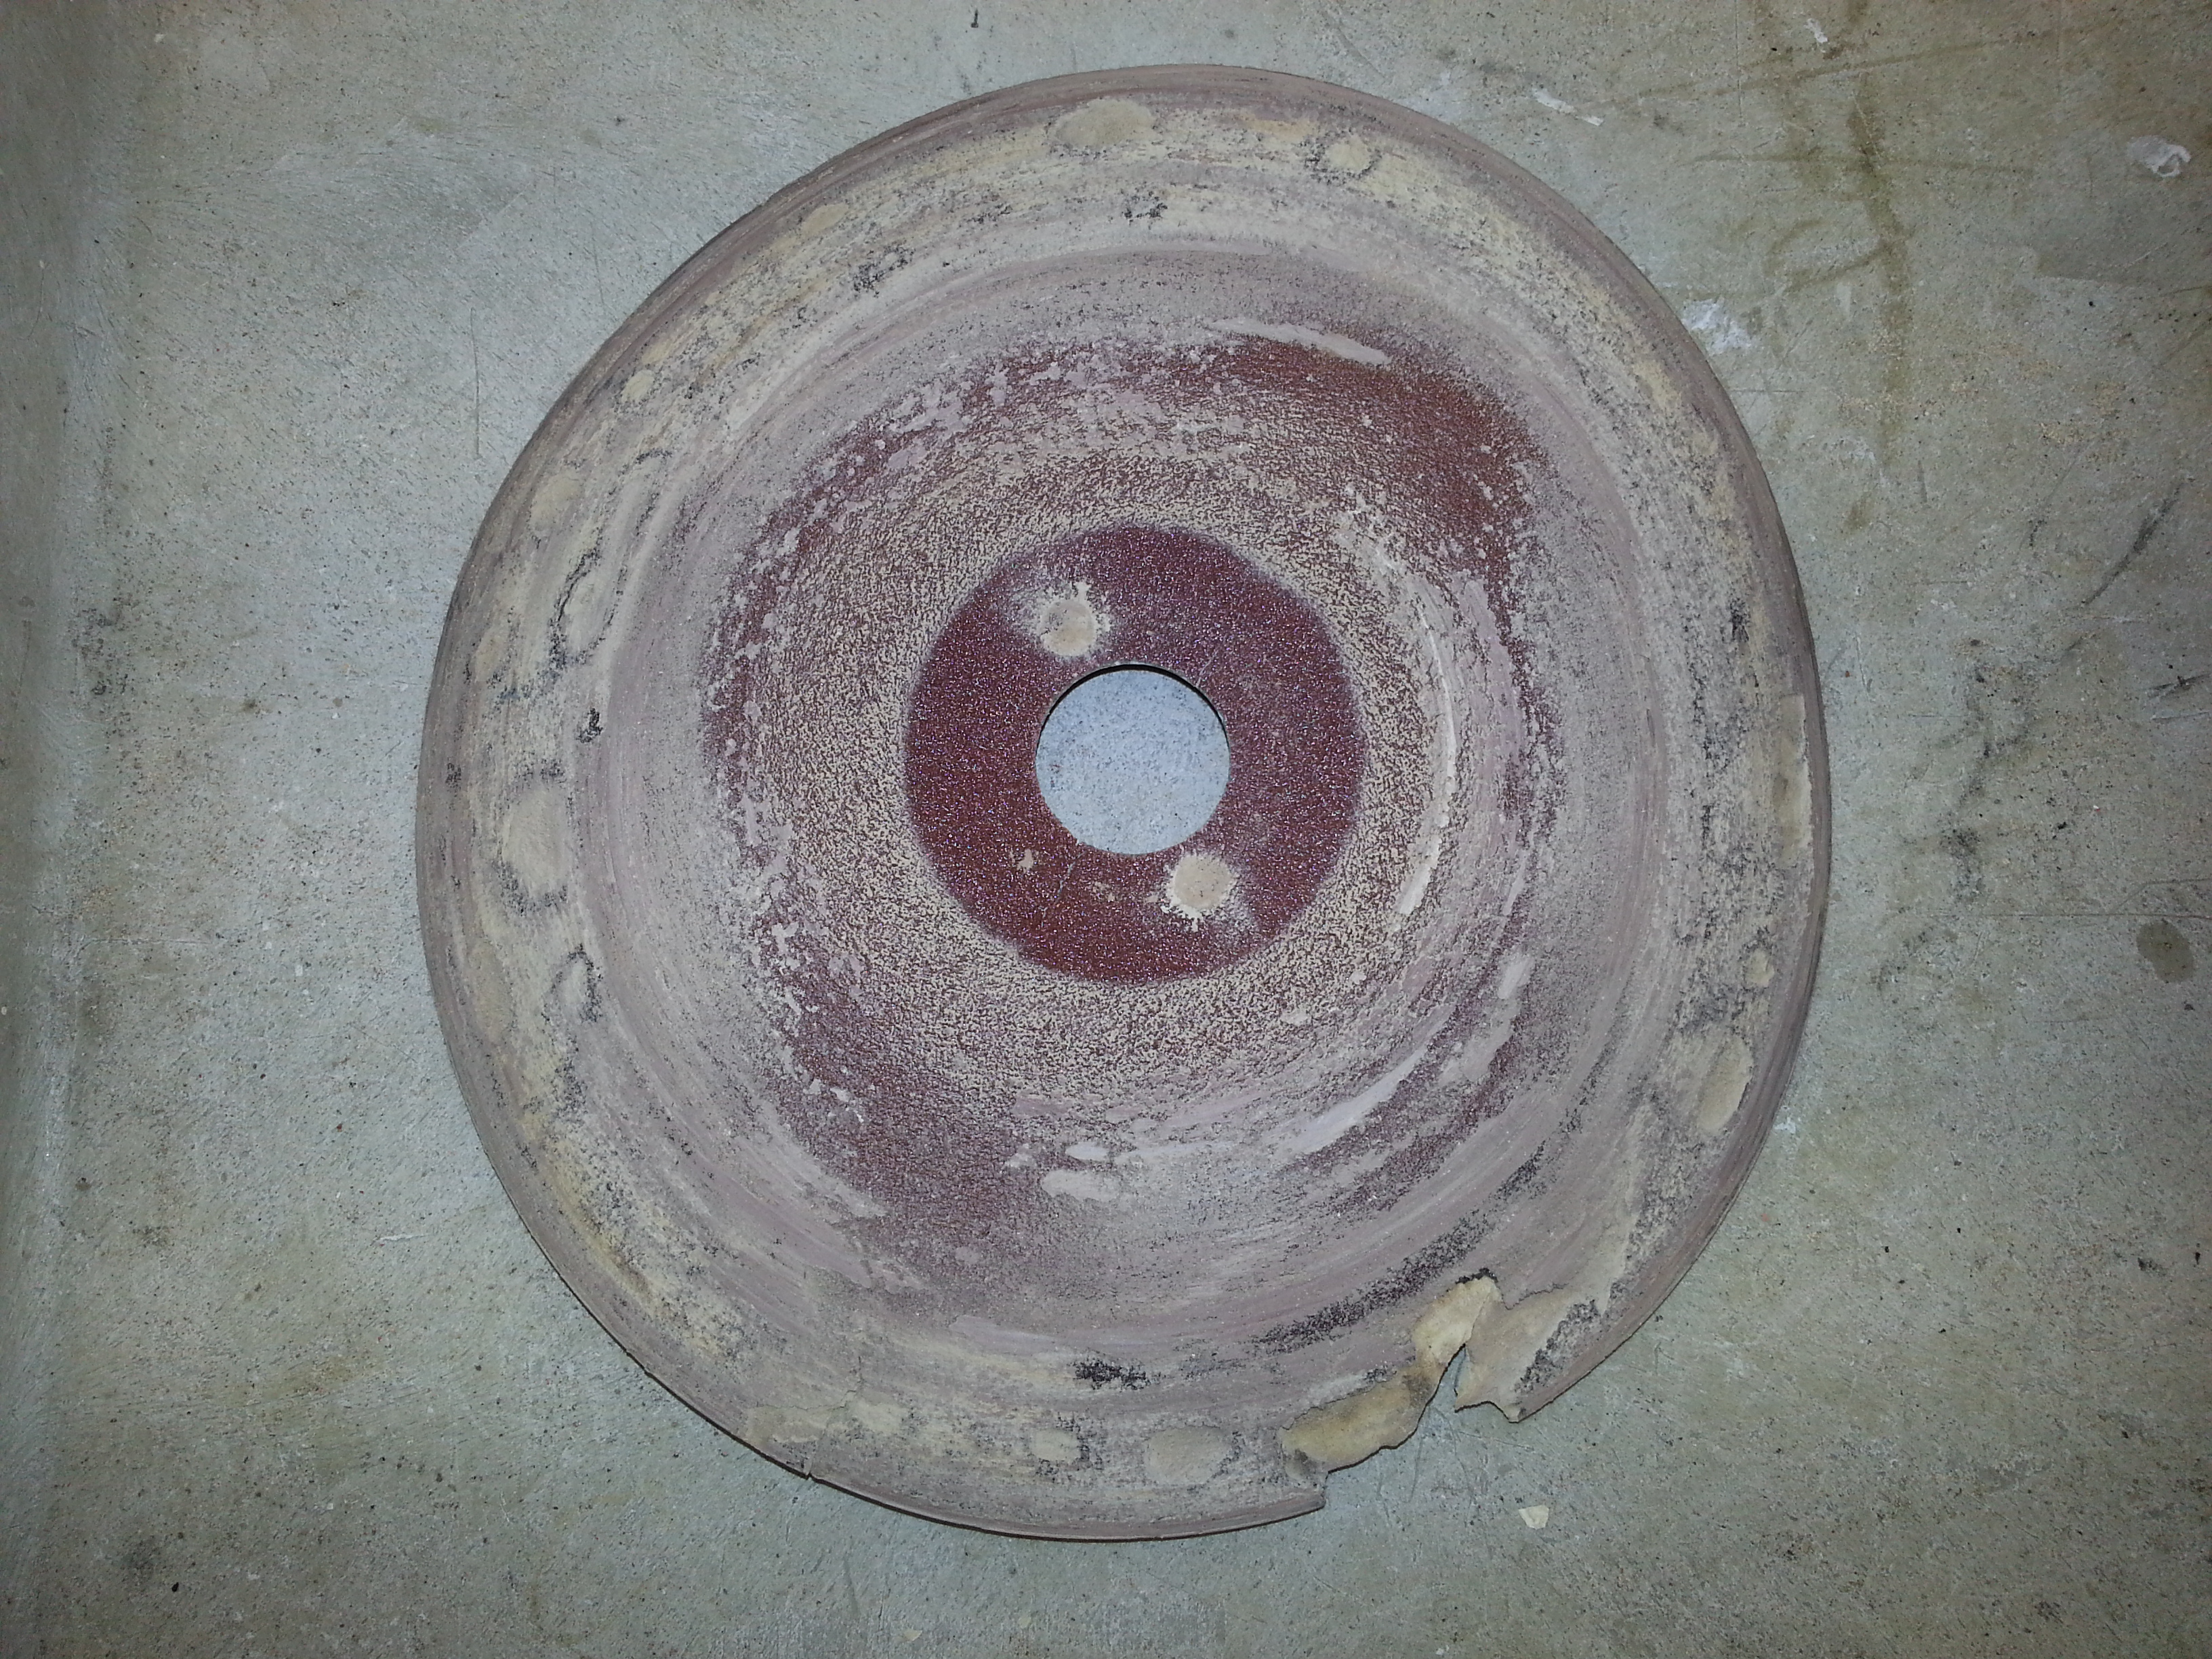
Well, sometimes necessity is the mother…, and to my utter amazement, once the disk fully clogged with paint, just a little bit more pressure caused it to start slinging paint chips off the wood better than a fresh disk, and with just the right amount of aggressiveness. The paint came off nicely, but the disk was more resistant to gouging the underlying wood. Now, it was still a lot of physical work, holding and moving the heavy grinder while applying the extra pressure, but if I didn’t let the disk overheat, I could do many feet of board before the grinding disk actually started to fray.
Even though it looks hopelessly clogged, this disk was still stripping off old paint readily, until I caught the edge of it on a protruding nail at 8500 rpm, and tore a chunk out of it, necessitating its replacement. Now, instead of worrying about clogging the disks, I actually had to “break them in” by letting them develop a coating of stuck on, melted paint, before they would work “right.” Soon, many feet of board were stripped smooth, and my arms and back were turning to jelly.
When I just couldn’t swing that angle grinder anymore, I’d just grab a selection of putty knives and scrapers, and chip off loose paint wherever I could find it along the way, and that’s when I dug into my next giant challenge. When the roof was replaced on the house 10 years ago, I had the job done by a very reputable and professional roofing company. Instead of fastening the new shingles with staples, as is the widely used and common method around here, they actually used roofing nails. I am certainly no expert, and arguments on this subject abound, but asphalt shingles that are subject to the fierce Arizona sun and ambient summer temperatures near 120°F, dry out faster than those in more temperate climates. As they dry, they become more brittle, and if they experience a good windy thunderstorm that lifts the edge a little, they will just crack at the thin spine of each staple, and fly off. Real roofing nails, although they are more expensive and take more time to install, provide a greater holding area around each nail head, and lessen the likelihood of tearing off the shingle in a storm. I can attest to that fact by personal experience, and that’s exactly what the roofing contractor, New Life Roofing, told me at the time. They did an absolutely beautiful roof replacement for me, and also roofed the shed to match a few years later when the original stapled shingles failed.
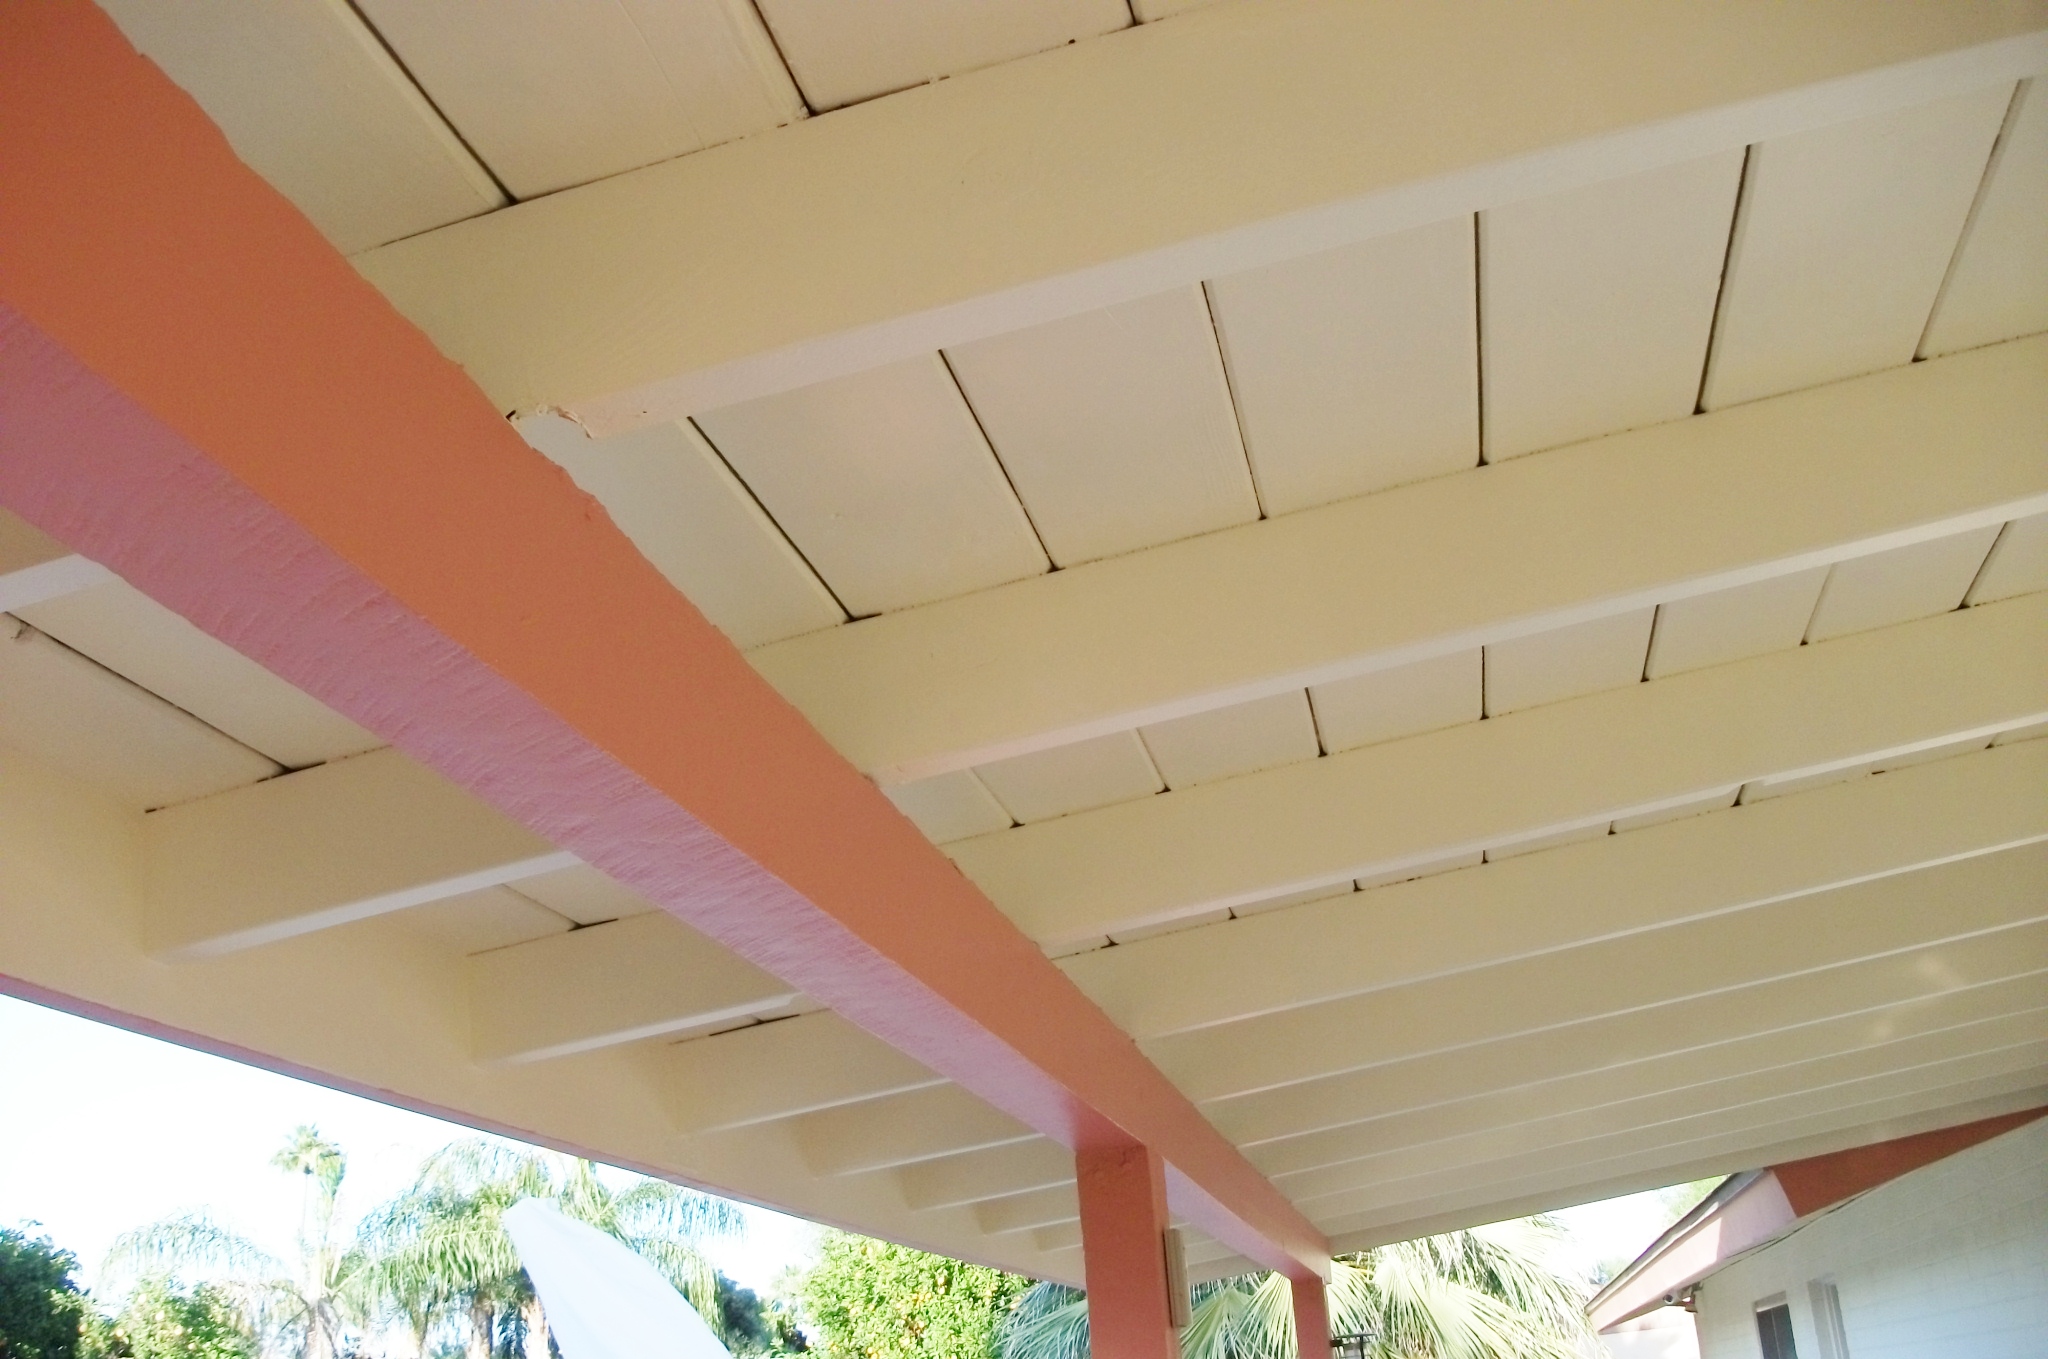
Well, back to my paint prep job…. The eaves of this house are exceptionally wide, ostensibly to shield the house and windows from as much of the summer sun as possible. As was common practice when the house was built, the roof sheathing is plywood, and therefore when you stand under the eave and look up, you see what might be described as an upside down “box,” defined by rafters on the sides, the wall of the house (or the bird board) at the back, the fascia board at the front, and the plywood roof sheathing as the bottom (or top, depending on your viewpoint) of the box. From here on in, I am going to refer to these areas as “eave boxes.”
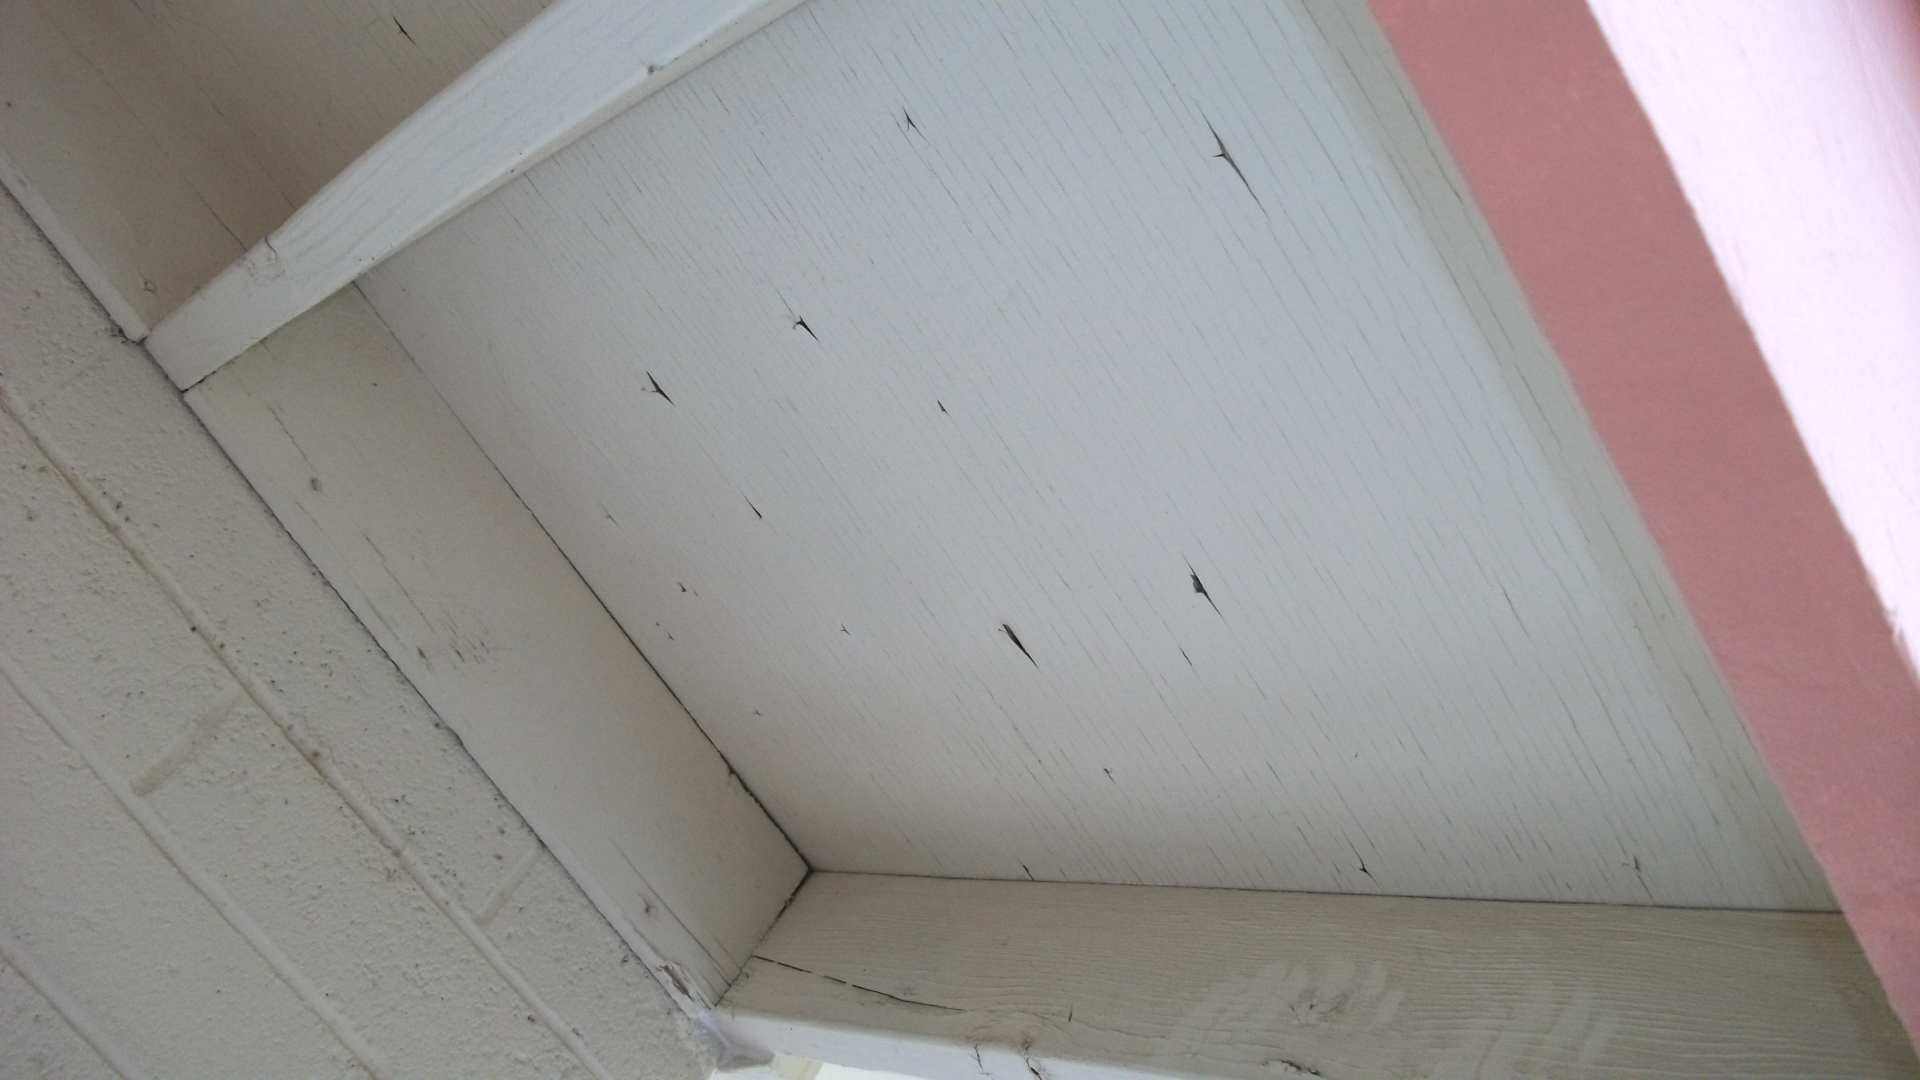
As you can see, there are many places where the roofing nails popped through just enough to crack the bottom surface of the plywood and create a pair of splinters that radiate outward from the nail point sideways in the direction of the grain. Over time, moisture and the brutally hot temperatures that the roof experiences, combined to crack much of the paint and roughen the surface of the plywood. I decided to start the prep there by scraping and chipping the worst of the loose stuff with an assortment of scrapers and putty knives. Once the raised wood around the nail points was removed and the worst of the cracked paint chipped off, I could see that the surface was going to need some sanding.
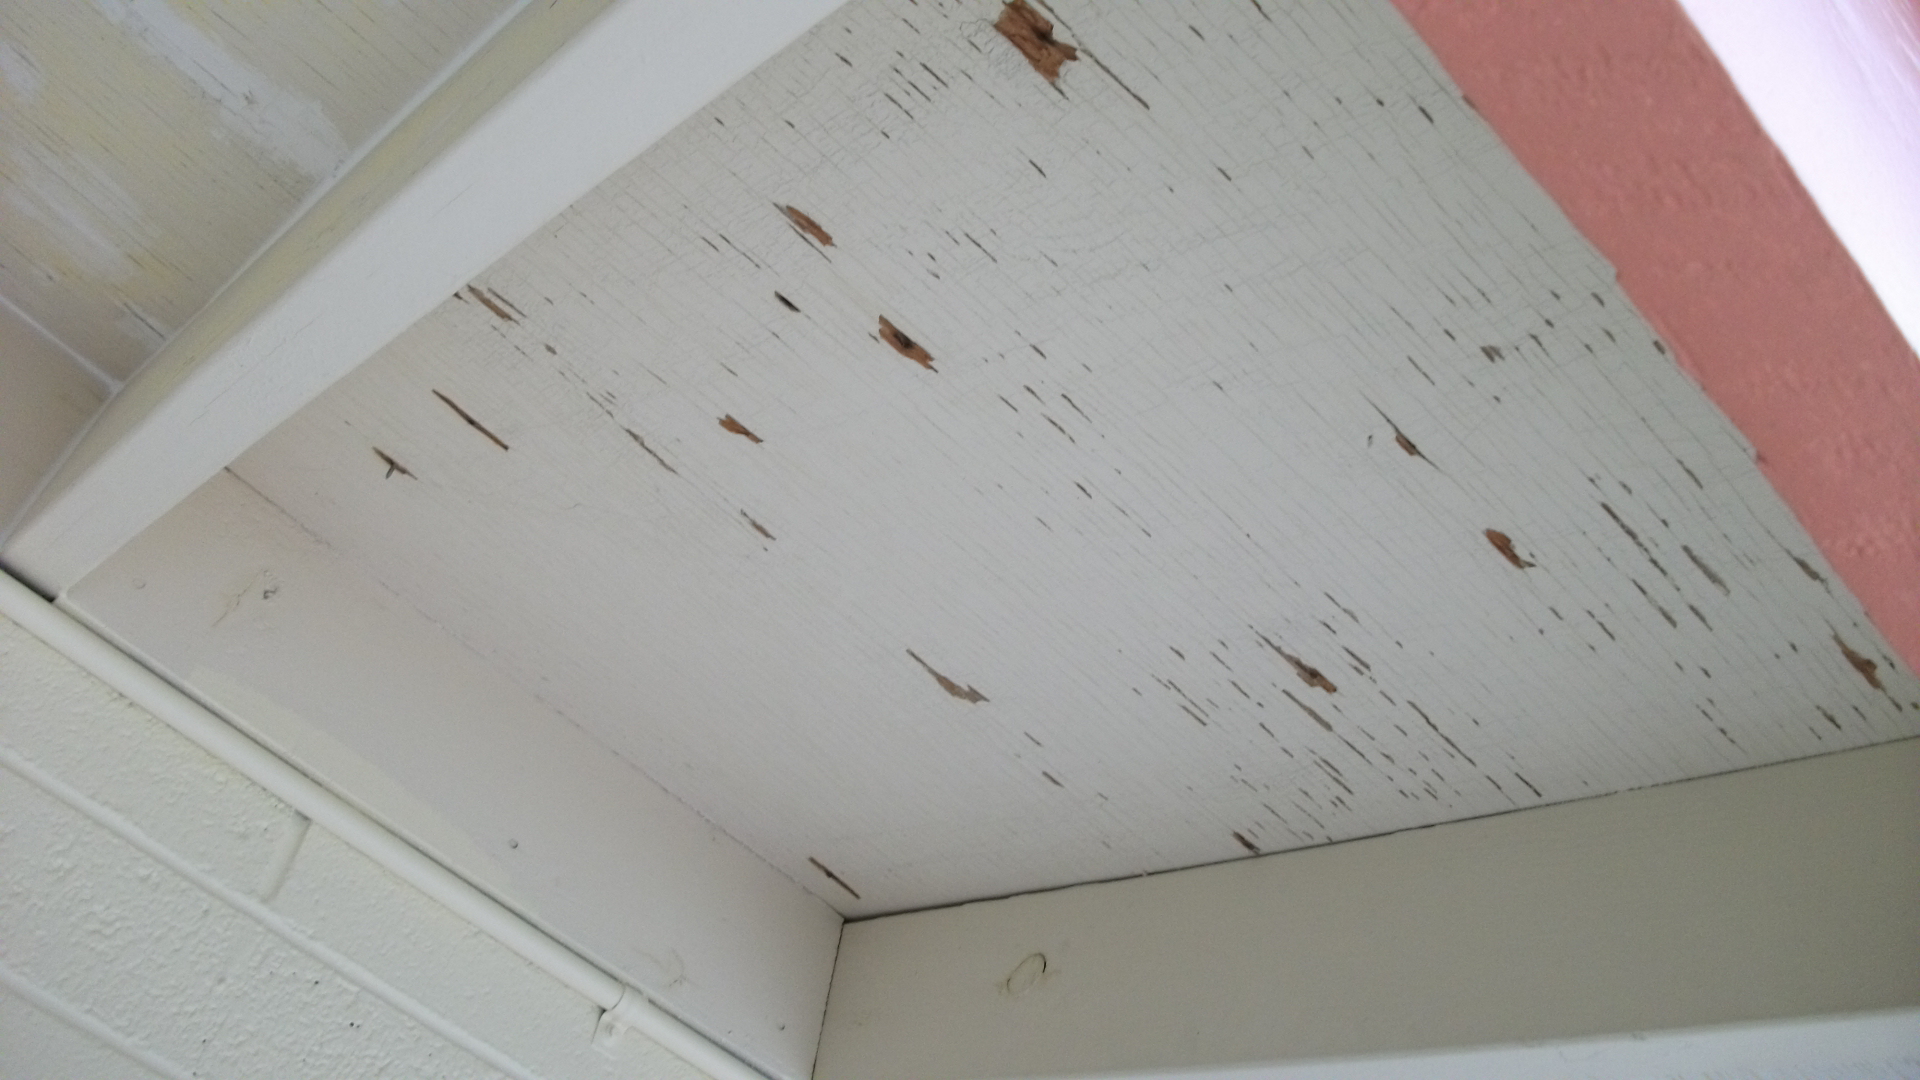
So, holding the random orbital sander with an 80 grit disk up over my head while standing on my Little Giant 3 Step Safety Step ladder, I began the tedious job of smoothing the surface and removing the less obvious, but still loose cracked paint. It didn’t take me long to figure out that this was going to be a very difficult job. With sanding dust raining down on me, and trying to put at least some token pressure on the surface of the wood with the disk, my arms, neck, and shoulders complained bitterly after just a few boxes. Furthermore, I had to be very careful, because each time I slipped a little and the sanding disk ran onto a nail point, the disk just shredded to pieces. All told, the house has a total of 51 eave boxes, and not one of them was in good condition. But, I was able to get six of them chipped and sanded before I just couldn’t hold that damn sander up over my head any longer. So, I blew the sanding dust off with compressed air and started back on the first one with a can of MH Ready Patch and my small flexible putty knife, and filled in all of the voids around the nail heads and the bigger paint cracks. Worn out for the day, I happily resolved to let the Ready Patch dry and harden overnight.
The next day, I sanded the dried Ready Patch smooth with the orbital. All the while, every time I was using the sander up overhead, I had to wear goggles and a respirator, as all the sanding dust just rained down on me. And again, if I struck a nail, the disk was often just ruined. But, I worked through the process on a number of eave boxes, until I had a nice section of around a dozen of them all chipped, sanded, puttied, and re-sanded. Years ago, when I was building and maintaining a number of desktop computers, I needed a tool that would blow the dust out of them, but would not be as potentially damaging to the more delicate components as a compressed air blow gun would be. At that time, I purchased a DataVac brand 500 Watt Electric Blower / Duster, and found it to be a mighty powerful tool. Now, I pressed it into service every time I took a break, and used it to blow the mountains of sanding dust off my goggles, respirator, clothes, and tools. It was the ideal tool for the job, and one of the handiest tools I had helping me with this painting project. I also used it to blow the worst of the dust off the newly sanded eave box surfaces, and then wiped all the surfaces with a damp shop towel, rinsing and wringing it out frequently.
Next, I caulked all of the seams “inside” the eave boxes and then let the caulk dry overnight.

Subsequently, I primed them, and after another day to let the primer dry sufficiently, I rolled them with a 7″ relatively short nap roller with the house body color.
Well, after alternately prepping more fascia board surfaces, and repeating the eave box process, I realized that the orbital sander was fabulous for many finish sanding tasks, but just to hard and slow to hold overhead under the eave boxes. What I needed was a very maneuverable sander that worked like the angle grinder but on a much smaller and gentler scale. My hunt for a better tool netted this prospect. DeWALT makes a really sturdy compact and powerful variable speed 3/8″ drill. At some point, someone thought to replace the drill chuck with a threaded shaft that could accommodate a 5″ hook and loop sanding pad, and adapt the nose of the tool to also allow a dust collector shield to be fitted. They sold it as DEWALT DWE6401DS 5-Inch VS Disc Sander with Dust Shroud. I found one at a local Home Depot, and purchased it along with a 50 pack of 80 grit disks. With very fine and linear trigger based speed control, and a fast top speed, I was able to now sand the plywood under the eaves much more effectively. Not only did the new sander cut the old surfaces much more quickly, but I discovered that I could slow it down to a mere crawl and precision sand all the way to the edges of each box. I did discover that if you allowed the spinning disk and pad to catch its edge in the space between the rafter and the plywood at speed, it would tear the whole tool right out of your hand and shred the disk edge to boot. This new sander was a Godsend! It was versatile enough to prep a variety of surfaces, but gentle and controllable enough to be almost universally useful for all but the rough surfaced fascia boards. It turned out to be a real workhorse, and definitely made the job go easier and faster. After I recommended it to a friend, I find out that it is discontinued by DeWALT, and my research shows that no one makes a similar product that works nearly as well. Some local stores still have them in stock, and so does Amazon as of today (September 2016), but if you think this kind of tool might be useful to you, get one now, before stock runs dry.
And so the job progressed; day after day of scraping, chipping, sanding, puttying, sanding some more, puttying some more, sanding again, priming, maybe more putty, more sanding, more priming and finally 2 coats of color, on all the fascia boards, and the eave boxes. At each of the three gables, the whole process had to be performed using my 22 foot Little Giant Ladder Systems step ladder in numerous configurations, along with two Little Giant Work Platforms, and a good measure of balance and respect for altitude. I cannot tell you how many times I climbed up and down that ladder, but I refused to work with power tools unless I was pretty much centered under the job, and preferably standing on the flat work platform. So, rather than reach way out to the side to sand or prime or paint something, I’d climb down and move the ladder instead. I know this is going to sound like a shameless pitch, but all three of my Little Giant ladders worked perfectly, solidly, and safely throughout the whole job. The ladder with the two accessory work platforms was as good a tool as I have ever used for a job like this, and in the 20+ years I have owned it, has done dozens and dozens of other jobs, solidly and safely, from tree trimming to straddling block walls. The two “Safety Step Step Ladders” (one 3 step and one 4 step) that I bought just for this house refinishing project were also worth every penny. I can’t say too much about their solidity, feeling of safety, and durability, as well as their usefulness. When using the tall stepladder in an “A” frame configuration, the ability to make one “leg” shorter than the other, therefore changing the lean angle, was the only convenient way to prep and paint the insides of the fascia boards all up and down the tall gables under their eaves.
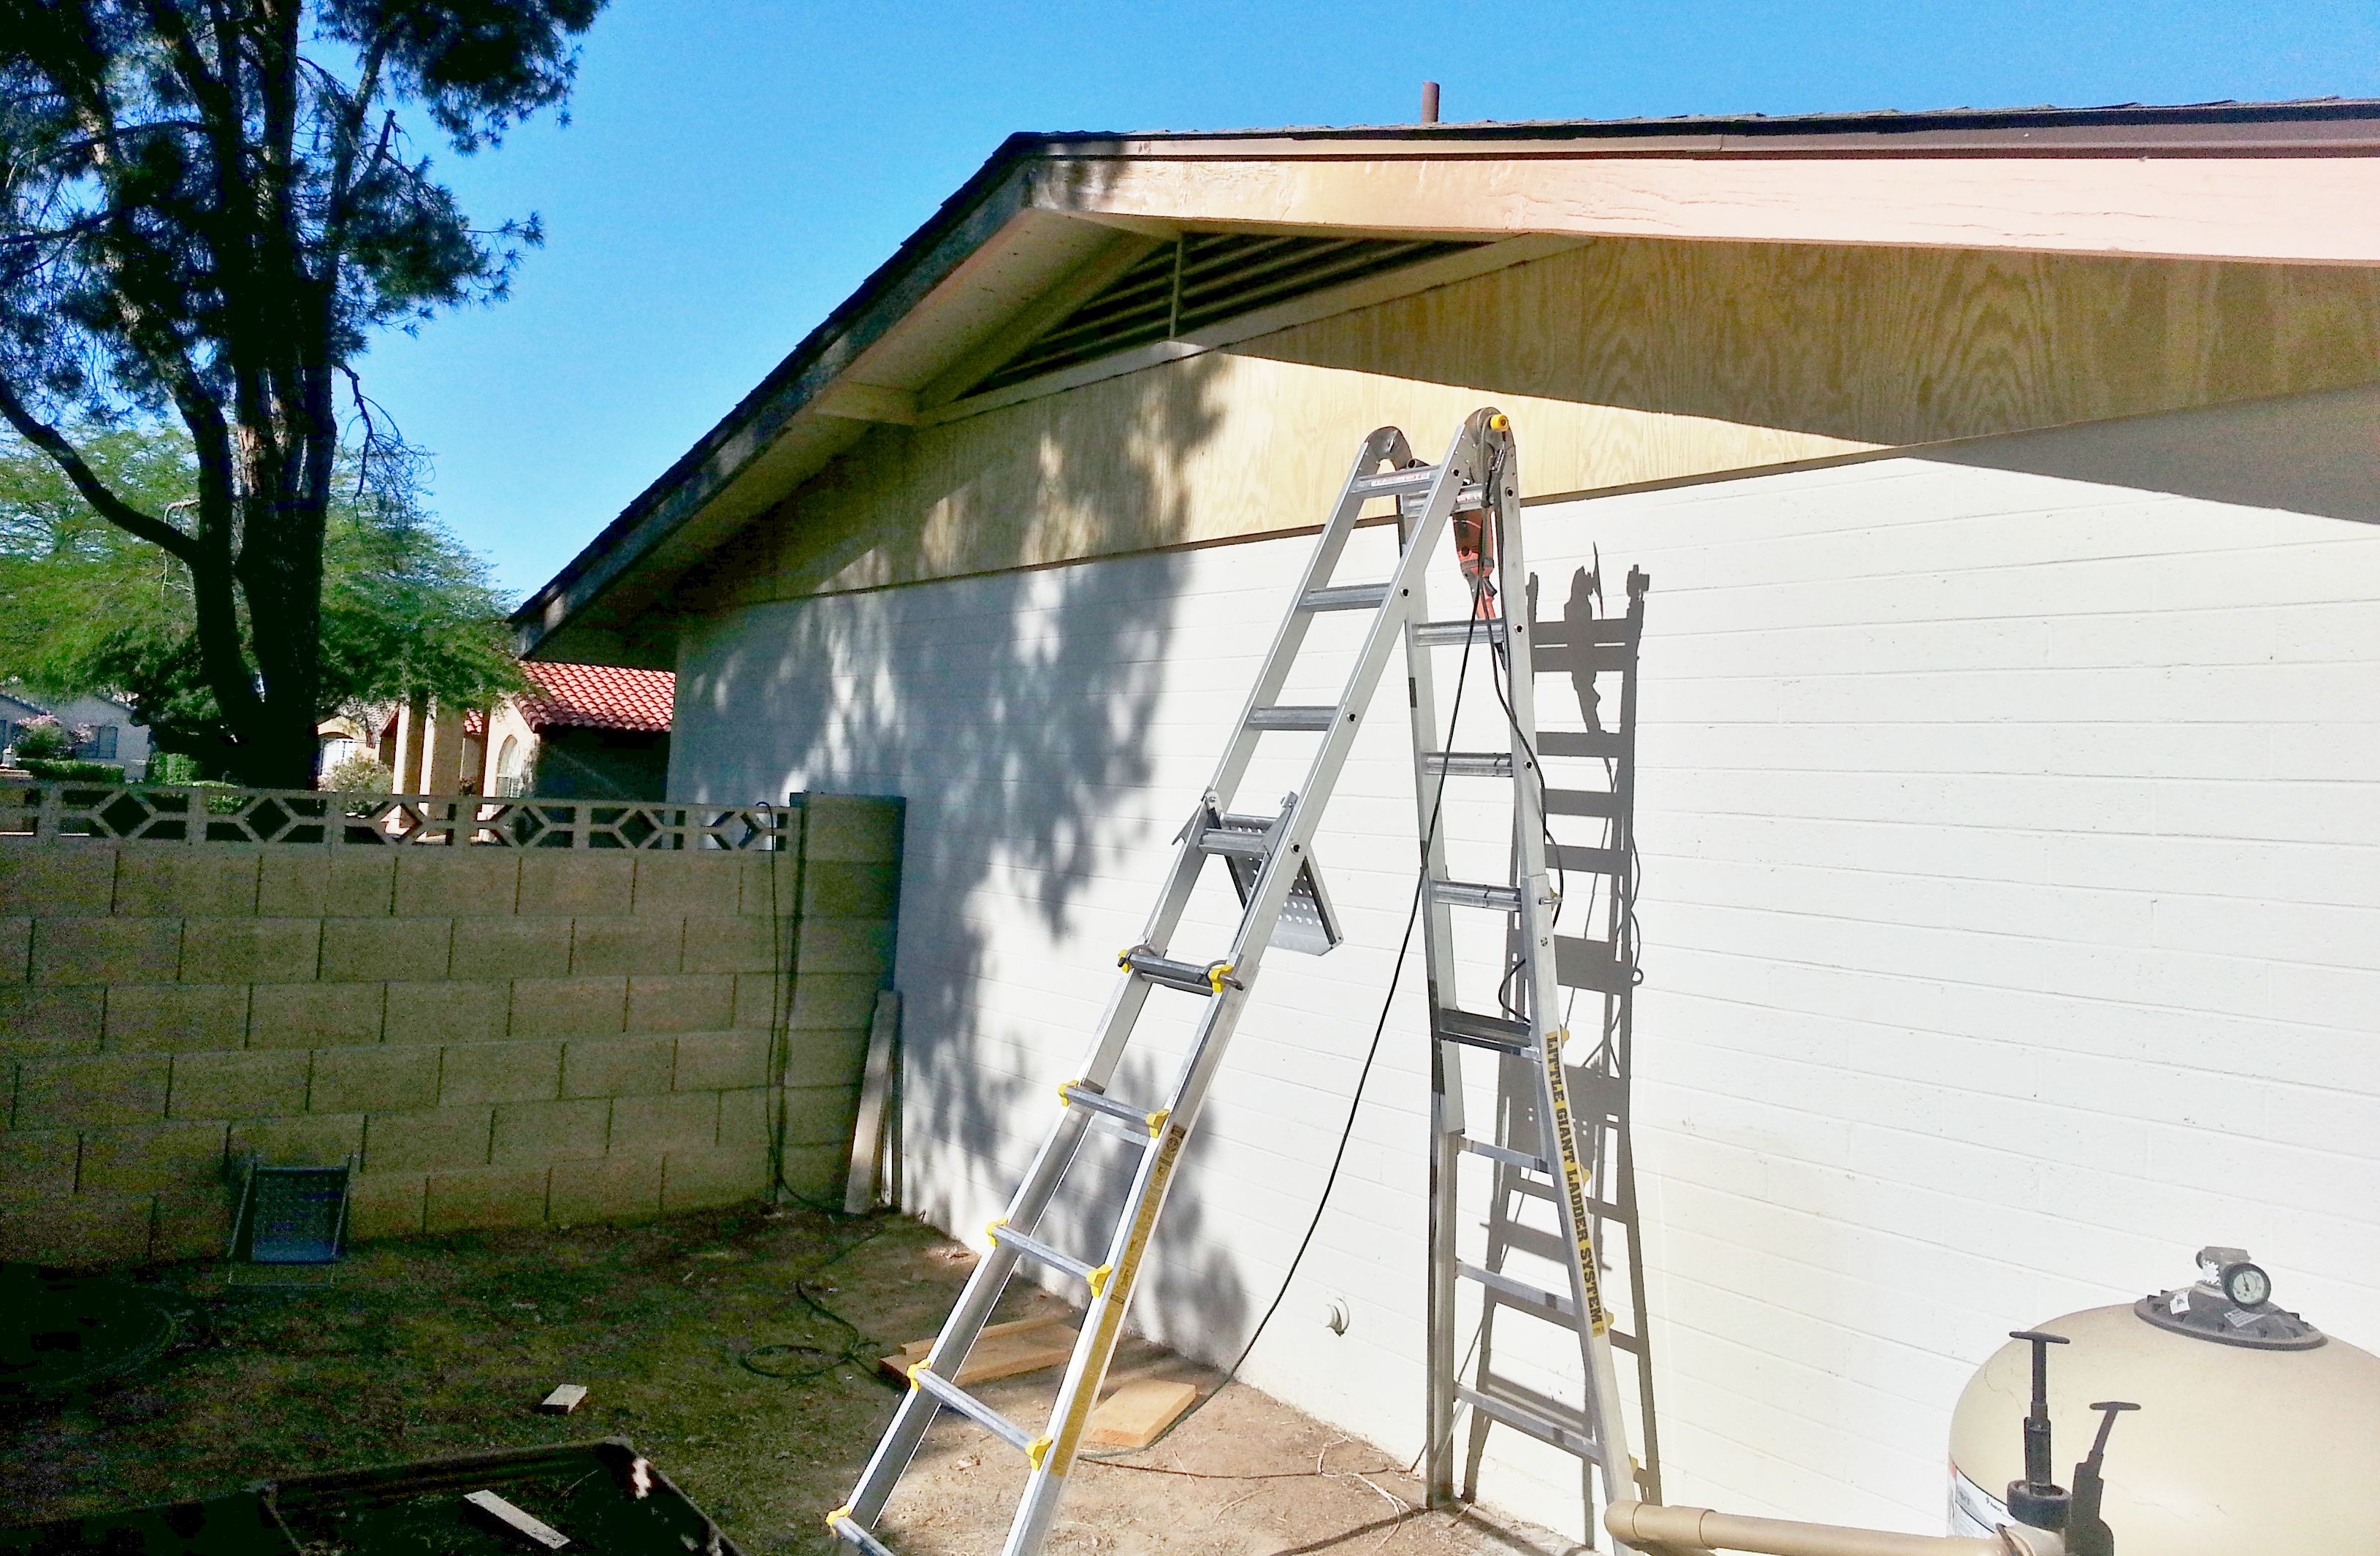
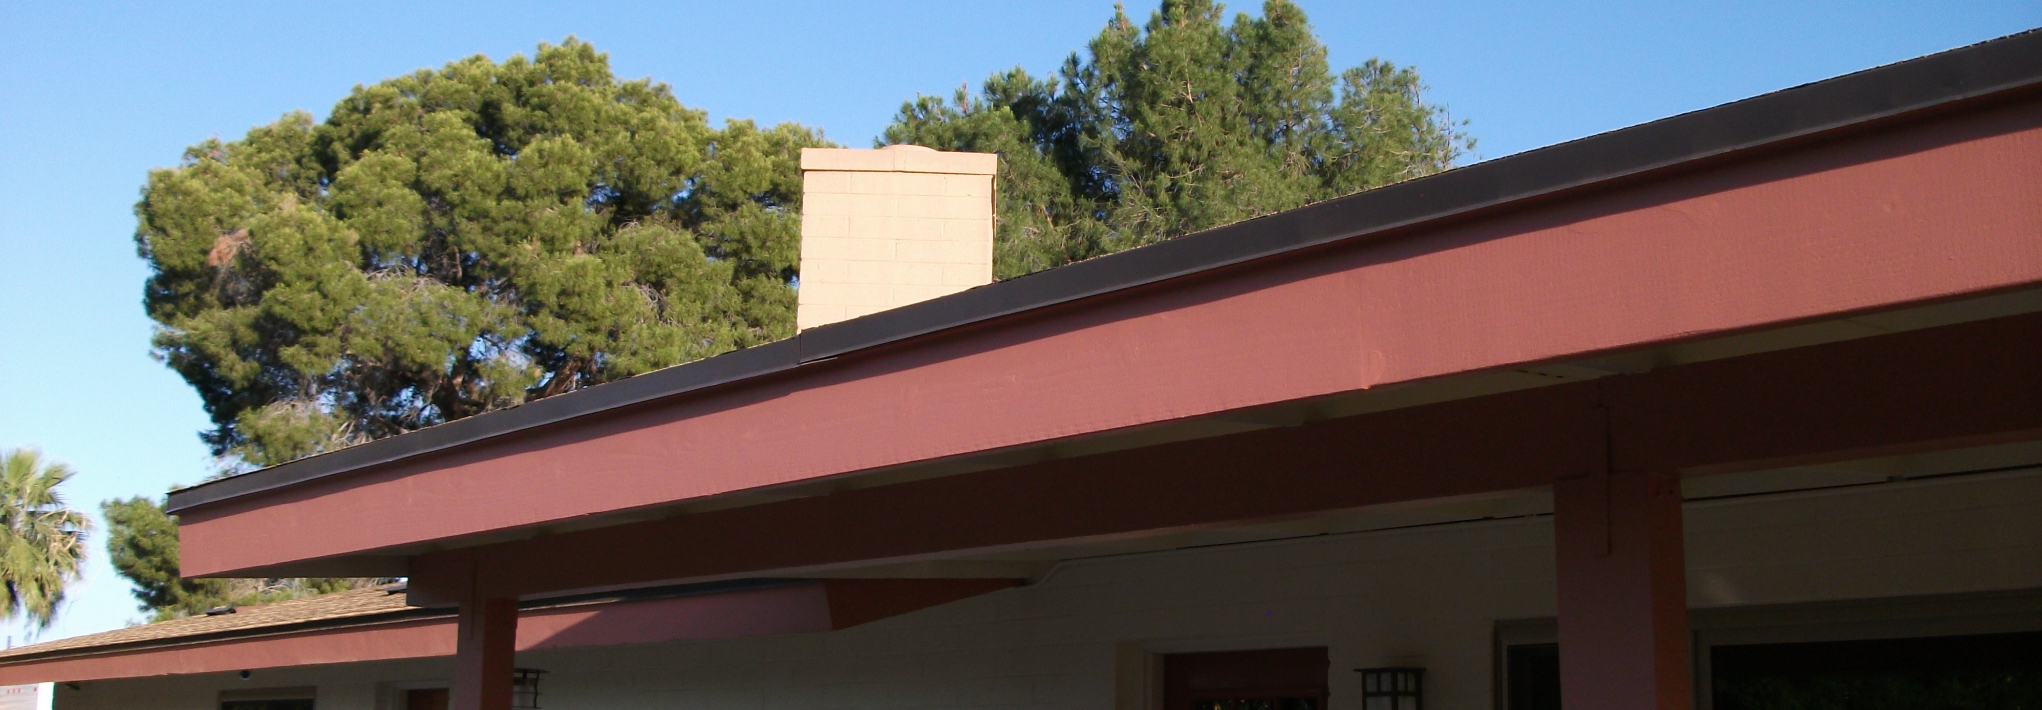
This picture shows the East end of the house, which is lower in height than the peak over the garage on the West end, but still required the ladder to be nearly fully extended. It can be set one rung higher, but that increased my nervousness factor immensely. Also, the ground on this end of the house in very uneven and soft in places, so I typically put a wood platform under the required leg or legs to straighten and steady the ladder. Incidentally, this end of the house also had the old weathered board and batten siding, and this picture shows it replaced with new plywood like the other end, although that part of the job was actually done nearly last in order to best accommodate the changing sun pattern as the season progressed.
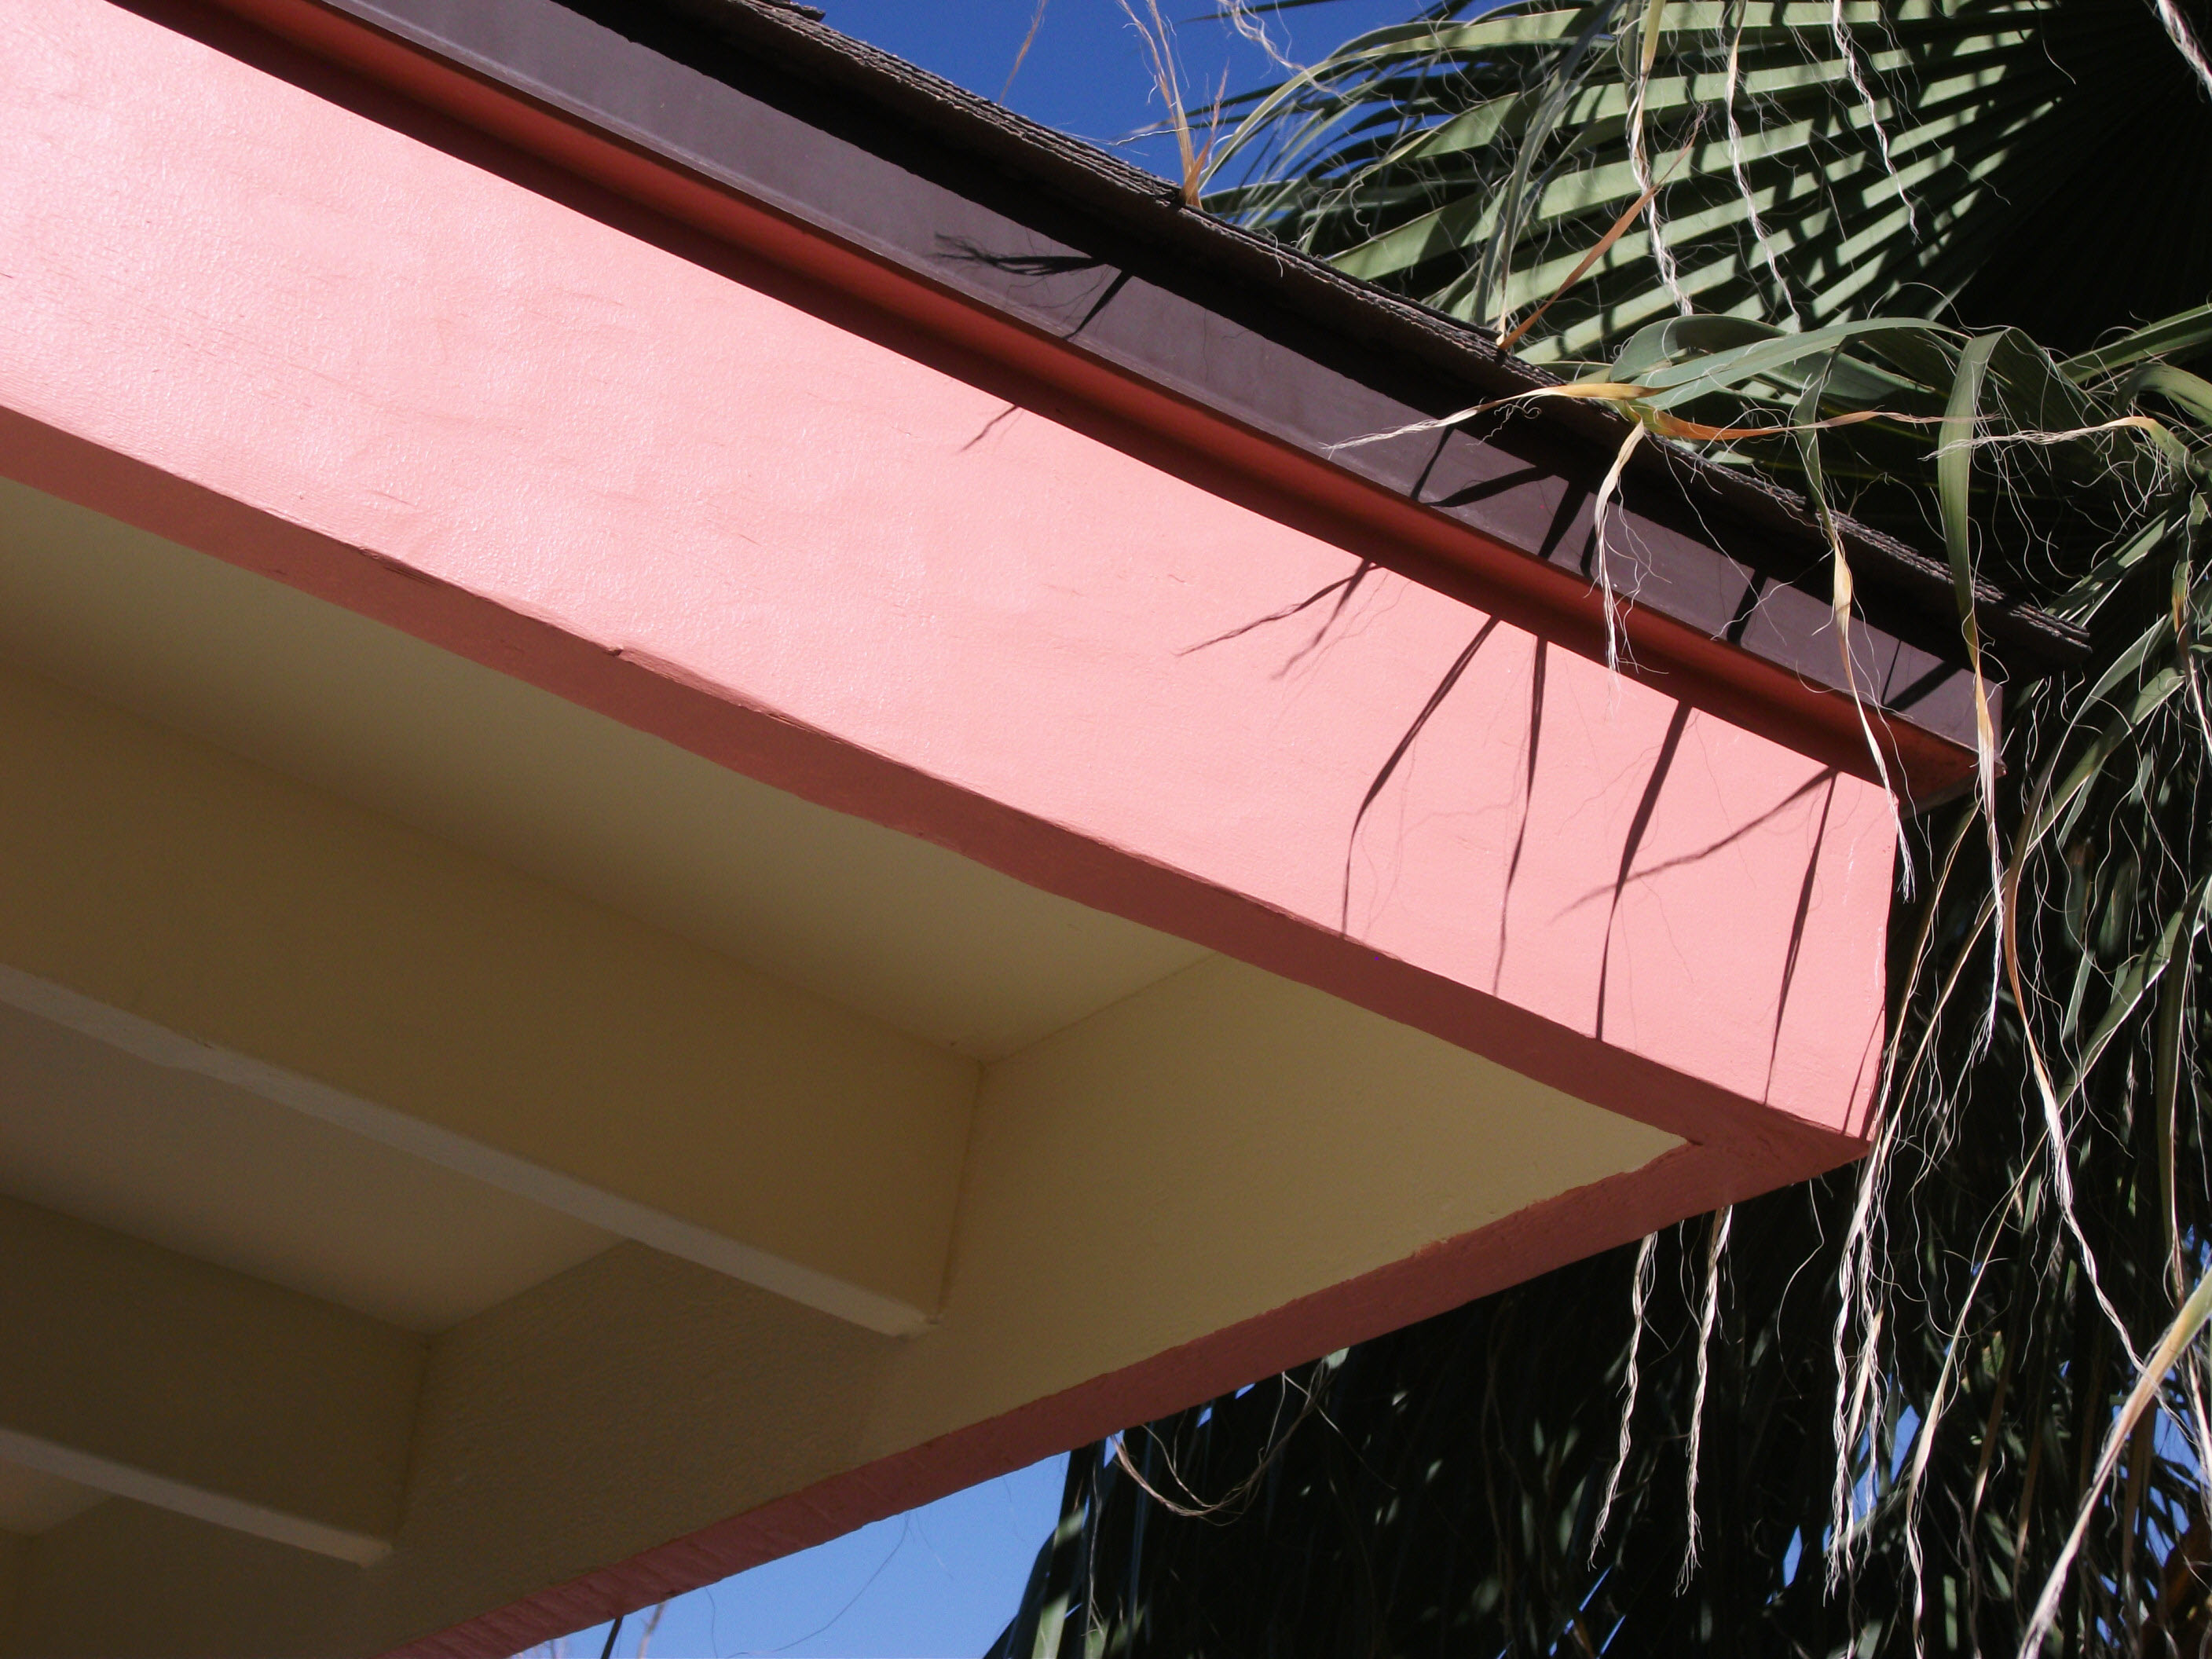
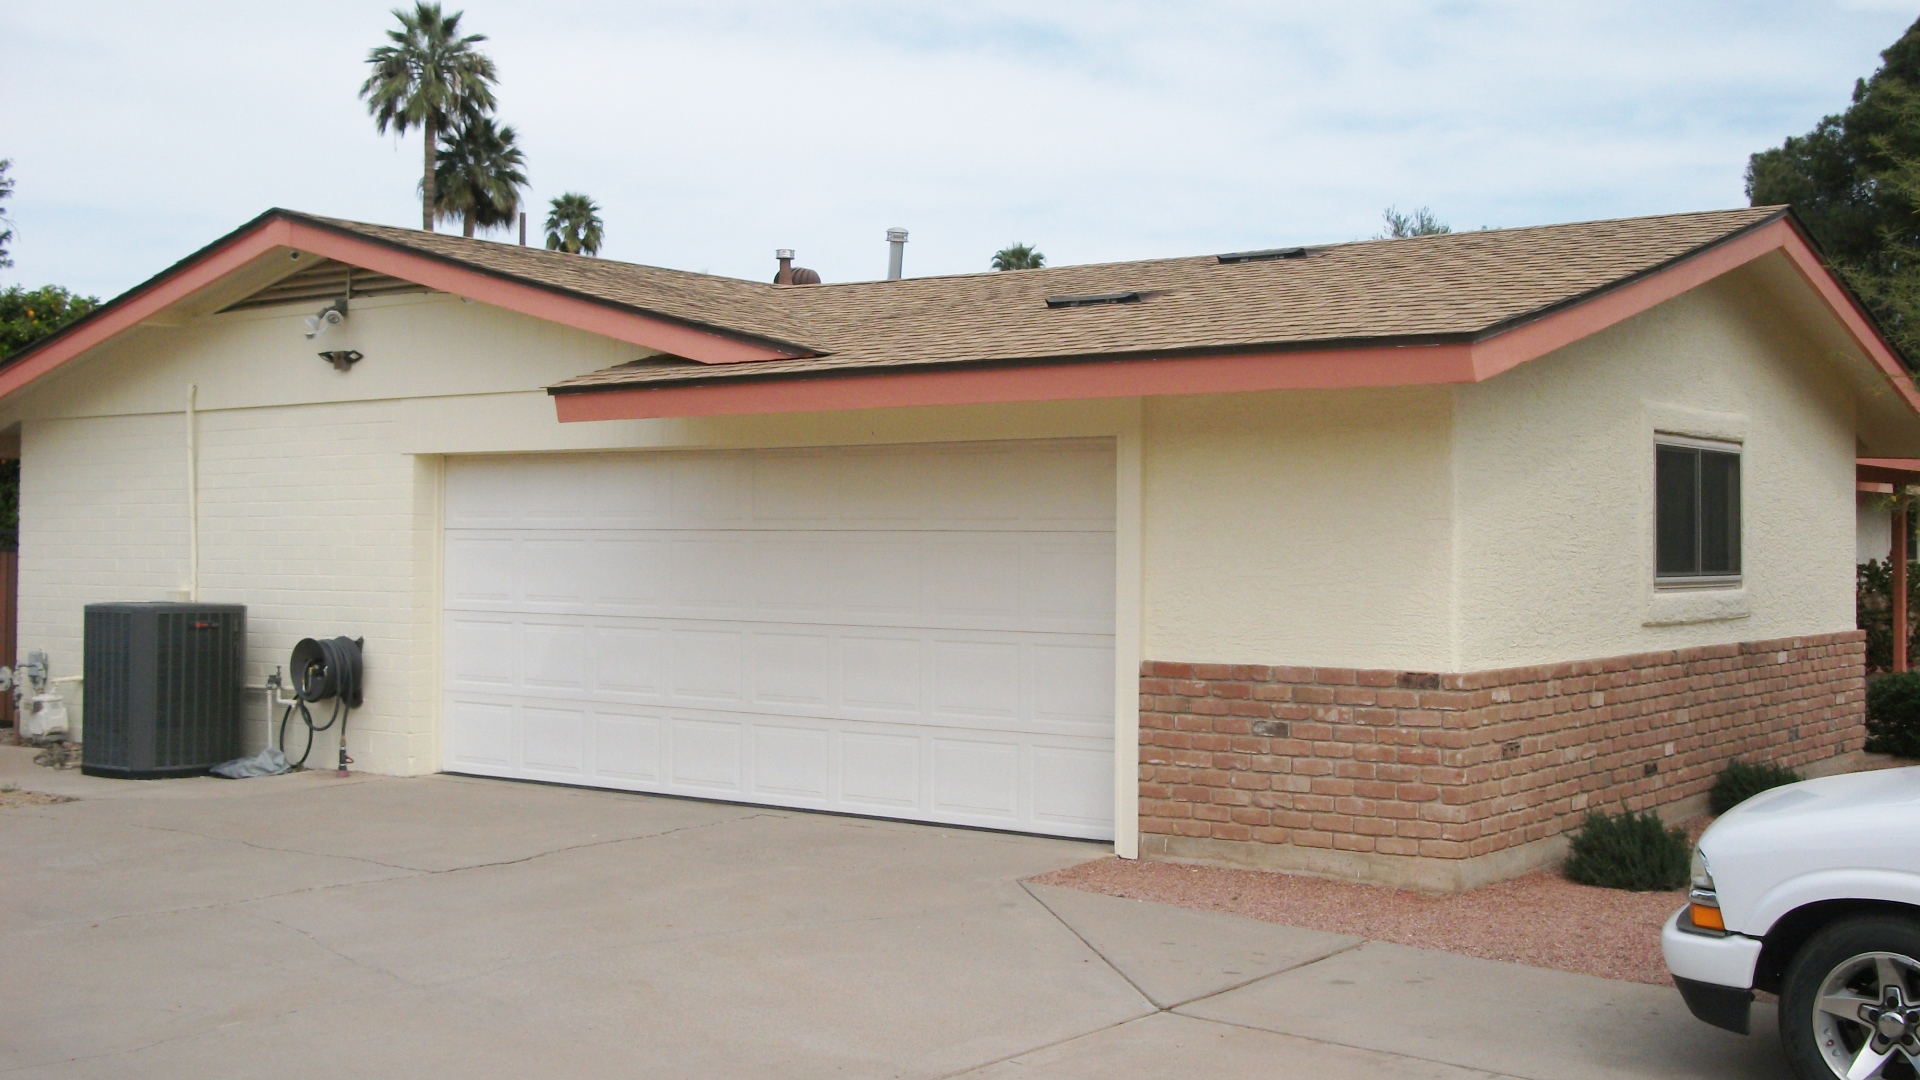
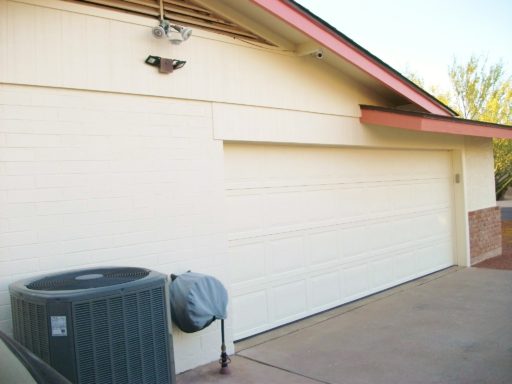
Once I had the fascia on the back and garage sides of the house all finished, and the all the eave boxes and the gables on those two sides done also, I decided to paint the house body on the garage front and side. I did it mainly to see what one complete section with all the trim and eaves finished would look like, and also to be able to have at least one big area completely done to give a little feeling of accomplishment. WOW! What a result! The finished corner of the house just “popped.”
The garage door is powder coated steel, and at this point we had decided to leave it the original “off-white” color that it came with when new, rather than paint it. We also couldn’t decide if we were to paint it, whether we would use house body “Cream Puff” or the trim color “Copper Leaf.” I used this picture and PhotoShop to simulate all the different options, and we couldn’t decide at this point, so we left it off-white. Later, we would revisit this decision.
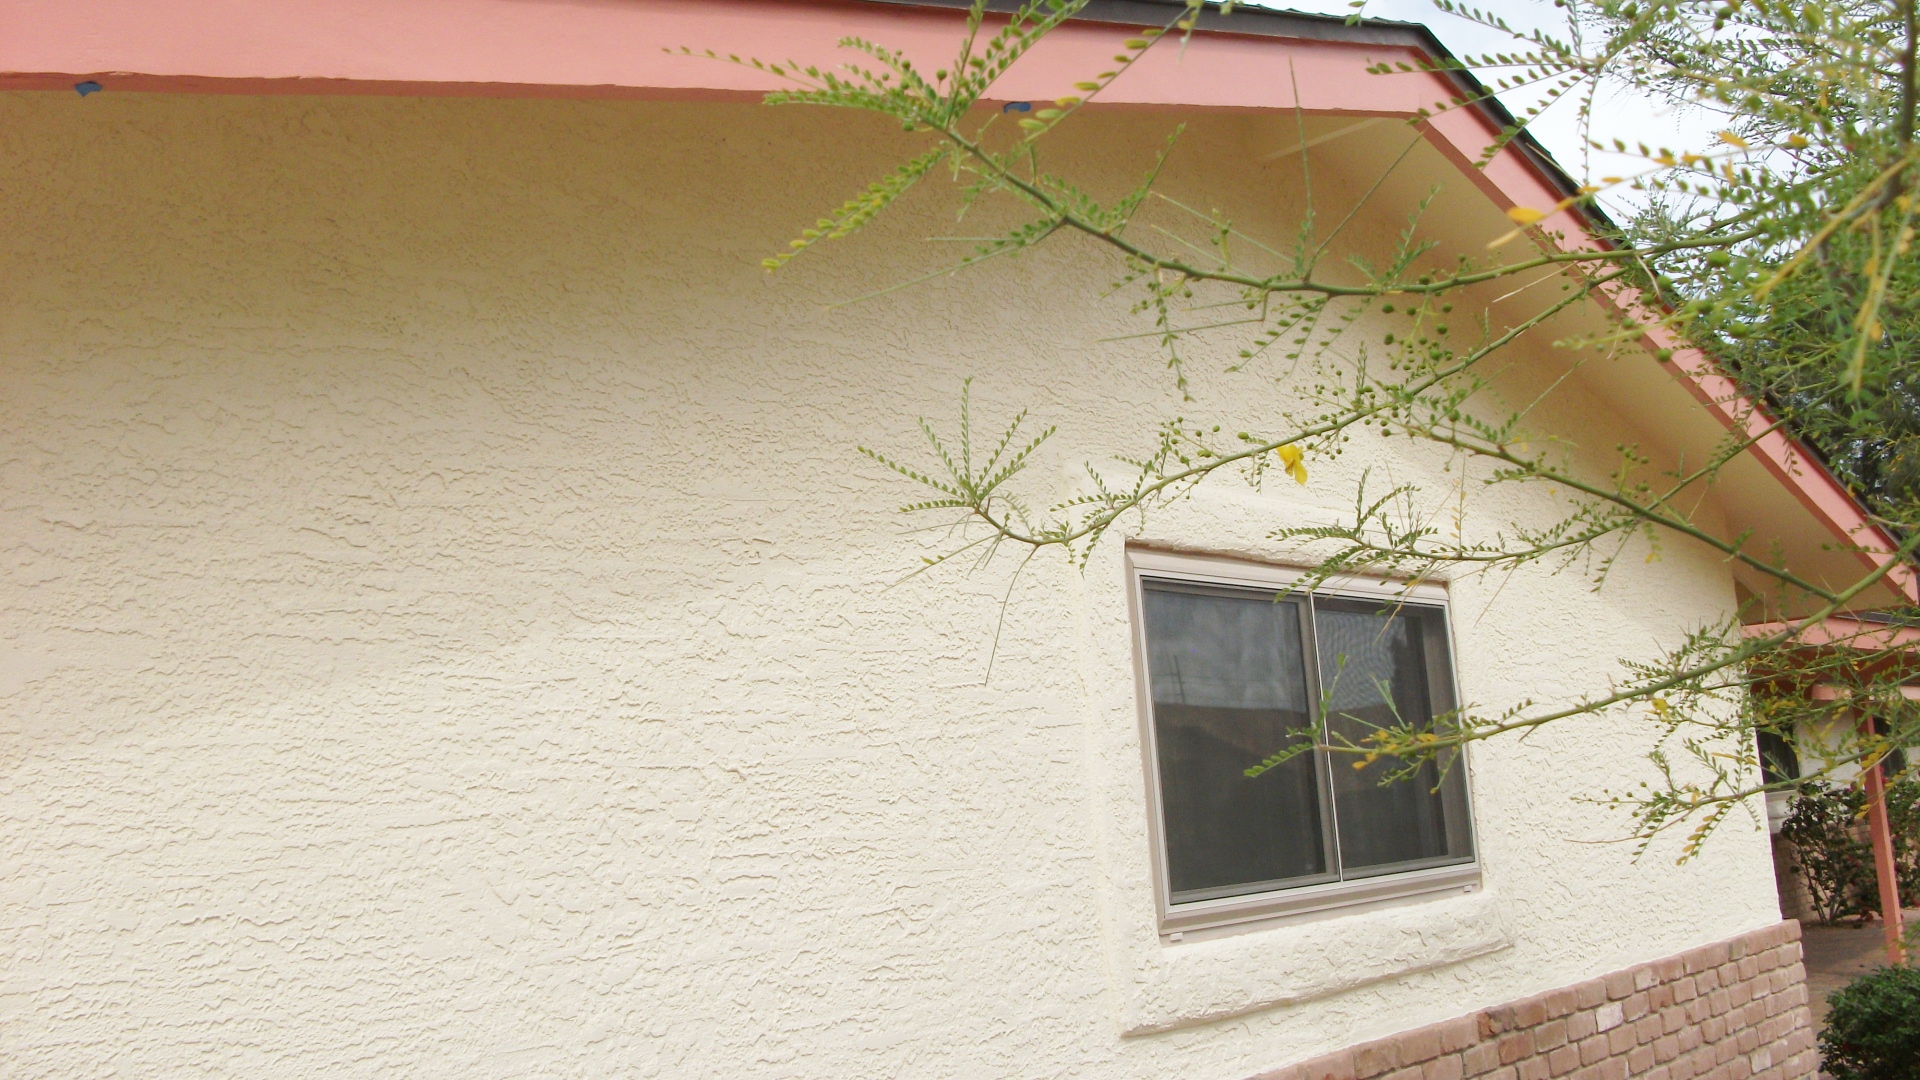
Now, this front corner, (and the rest of the front above the red bricks) is a very rough stucco that I mentioned we had installed in place of the original avocado green board and batten right after we moved in 25 years ago. I had resolved that I would paint it with a really deep nap roller, despite advice from a couple of people to use a sprayer. You see, the original paint that was applied when the stucco was new was sprayed on, and it had left countless voids and holes which always made it look even more textured and rough than it already was. So, I wanted to give it a more smooth and homogeneous look, hence I chose to roll the paint on. Little did I know just how difficult of a job that was going to be. I picked the very best quality super deep nap Purdy roller, and filled it with paint right from the 5 gallon bucket using a bucket screen to evenly distribute the paint onto the roller. Well first, when I pulled it out of the bucket, it weighed a ton. Next, no matter how carefully I stripped it off on the screen, it was so loaded that it threatened to drip everywhere, especially onto the red bricks. That wasn’t going to do.
So, I quickly used masking paper and red stucco tape and masked off all the brick surfaces, taping the paper to the top of the bricks, and folding down along the face and taping it there too. Once the brick was protected, I began to roll the paint onto the rough stucco, and roll, and roll, and roll. Each square foot had to be re-rolled what seemed like endless times before the paint filled all the nooks and crannies in the stucco. Furthermore, it tried to pool and puddle and drip in places where the stucco formed ridges and ledges that served to effectively squeegee the paint out of the soaked roller. Progress slowed to a crawl, as I learned to apply the freshly loaded roller near the top and then figuratively stretch and spread the paint towards the bottom. With perseverance and patience, and with rapidly weakening arms, I managed to get a nice even, relatively heavy coat onto all the stucco surfaces by repeatedly re-rolling the same small area over and over again at varying angles before moving on to the next small section. My persistence paid off, though, because the finished surface looked absolutely beautiful the next morning after it had dried. Sure, there were a bunch of places that still needed some remedial touch up, but my goal of effectively smoothing the surface was accomplished.
Much of the house was now starting to come together, as I alternated between doing the many steps necessary for finishing big sections of fascia, and pressure washing, scraping, and painting the easier block wall surfaces of the house body. Even though the pointing between the blocks was recessed enough to require multiple passes with a medium deep nap roller, painting the block portions of the walls went significantly faster than the stucco did. What slowed us down was removing the screens and then masking all the window frames and glass with blue tape and plastic sheeting as we came to them on each wall, and then peeling all back off before it stuck so hard as to leave masking tape residue everywhere.
Meanwhile, I began to think about what I wanted to do with the house electric utility boxes that were an eyesore on the back of the house.
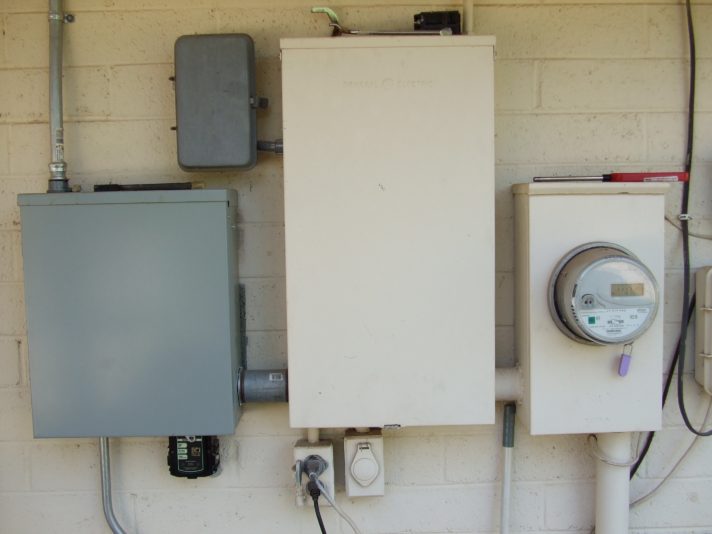
Some had previously been painted with house latex paint, others were still in their original gray color, and the sprinkler box wiring was just haphazard. I took one of the paint color chips to the Home Depot, and looked for a close color of spray paint that could lend some gloss to the metal boxes. I also figured that if I found a good close match, I could use it to also paint the gable vents on both ends of the house after I scraped and sanded them too. As luck would have it, I found a very close color of Rustoleum, and I bought a can to try it out.
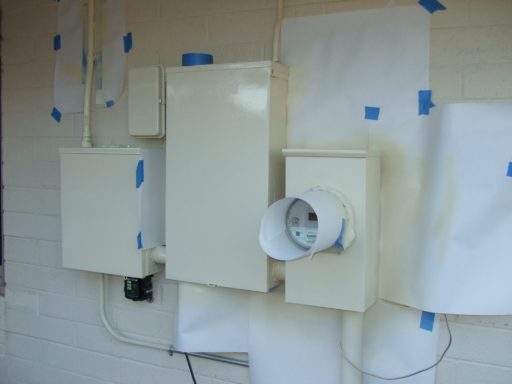
First, I used the orbital sander to remove as much of the old latex paint from the boxes as possible. Then I wet sanded them smooth, and masked everything I didn’t want colored, and sprayed a coat on. It wasn’t perfect, but a vast improvement. Of course one of the boxes developed a run on the face, and I had to wait for it to dry completely, wet sand it again, and re-spray it, but eventually, the old electrical boxes and conduits looked acceptable.
I never achieved the “perfect” finish on them, but I believe it was due to a combination of heat and humidity while painting, and the
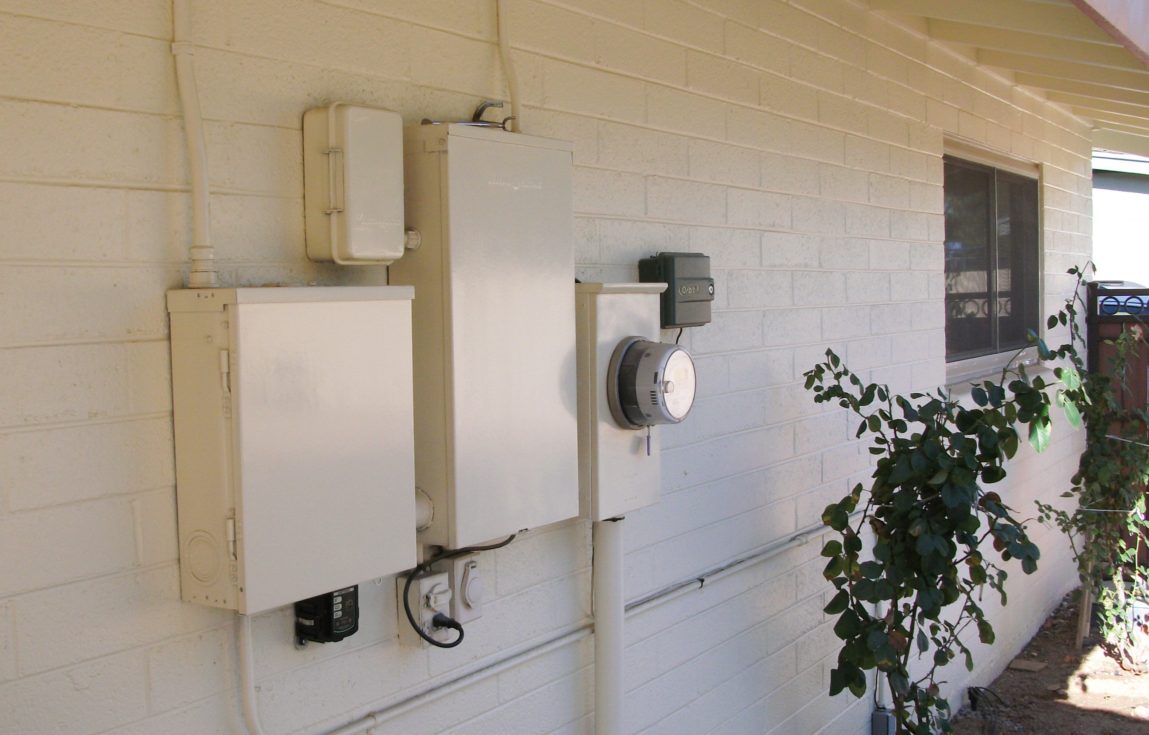
fact that I wasn’t using my favorite brand of spray paint; Krylon! I just couldn’t find a place that had as big a color selection of Krylon as the HD had of Rustoleum, and color match was important to me.
By now, most of the house and trim were finished, and one last BIG project remained. The rear patio ceiling was all made of tongue and groove planks that had never been really properly prepped prior to painting. As we were now getting into spring, the East wall of the house was the very last big surface that still needed body and trim color, but I decided to leave it to be done last, as I knew it would go quickly. And so, I started to prep the rear patio. First, I decided to tackle the replacement of the 26′ of fascia boards that I had removed in the fall near to the beginning of this whole project. Again, equipped with my measurements, I visited a few lumber yards, but only one had anything even close, and it was so rough sawn as to be virtually unusable, and they wanted big money for it to boot. After a day of frustration, I made an “executive decision!” I would buy two sixteen foot long 2″ X 10″ pieces of standard lumber, and using my new bladed Skill Saw, rip them down to the required 7 1/2″ width. (As you know, a 2″ X 8″ is actually 7 1/4″, so that would be too narrow.) I also purchased sufficient 1″ X 2″ drip rail moulding, and a box of fancy Torx® head rustproof screws to fasten the drip rail mouldings to the new fascia boards.
Before installing them, I began the arduous task of sanding the ceiling, rafters, and beams of the patio. I couldn’t have imagined how much work that became. Thankfully, I had the DEWALT 5″ disk sander, because using the orbital alone would have made the job impossible. I sanded with my arms up over my head for two days, and finally had all the rough, chipped, and cracked spots smooth.

Then, over the next few days, I puttied all of the gouges, knot holes, and rough parts, and sanded them smooth once the putty hardened. Once that was done, I turned to the new wood for the fascias.
With my very capable helper, we had the new fascia boards cut, trimmed, and primed in about half a day. Then we screwed the drip mouldings on, and primed them too. The next day, we put color on the inside surface, and after it dried, screwed the new boards to the ends of the patio rafters. I added some steel hardware at each corner on the ends, and a steel plate in the middle to keep the 45° joint tight. Even without the trim color on the outside, the new wood looked way better than I would ever have been able to accomplish trying to rescue and refinish the old boards.
We waited for a perfect, nice cool morning and primed everything that was exposed. Getting paint up into the joints of the tongue and groove ceiling was slow and painstaking work, but my helper patiently cut in all the seams, and filled the joints using a combination of brushes, small rollers, and foam daubers. Even though we ended up priming it all in one day, we really should have taken two days, as we were completely sore and exhausted afterwards.
The next day, I painted the first color coat onto the new fascia boards, and finalized the caulking of the bird boards and rafter joints at both ends under the roof. Waiting a day for the caulk to dry, we color coated the entire patio roof in one session, with my helper cutting in, and me using a 7″ roller to paint the rafters and the ceiling. When it was all done, it looked spectacular!
With that huge job finished, we turned out attention to the East wall, the last job that needed to be done. The wood had been replaced already with new plywood siding, and the same level of prep that all the other eaves and fascias had required, was nearing completion. It took about 2 weeks to complete the prep, and get the whole wall ready for color, using all the same steps I have detailed before.
Finally, the day came that we decided to do the final color coat on the very last wall of the house. Spurred on by the prospect of being nearly finished, we colored both the body and trim the same day in one long effort. By the time we finished the body color, the trim was ready for its second and final coat, and then it was time to clean buckets, brushes and rollers for the last time, just as we had done dozens of times before. This time it seemed like an easy task!
Two days later, I climbed up the ladder on both ends of the house for the last time and sanded and sprayed the gable vents with another couple of cans of Rustoleum, and the job was completely finished.
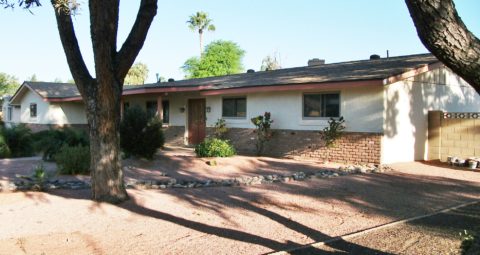
SEVEN MONTHS after I had scraped some chips off the first fascia board, the house exterior was completely refinished. Wood had been replaced, fascia corners rebuilt and restored, miles of seams had been caulked, and endless sanding overhead was finished. What seemed like an acre of putty had been spread, sanded, and primed, and every surface had at least one, and often two coats of beautiful eggshell finish color. The whole house looked like it had been dipped in candy. EXCEPT for that off white powder coated garage door. Well, after all that work, it took no time at all to roller a thin coat of house body color onto it, and the also the garage door on the shed all in one morning, to add the coup de grâce.

With the tools that I bought to do this job, all of the sanding disks (some of which I have leftover for the next job), the paint, caulk, putty, primer, and wood hardener, the angle grinder, the sanders, and the extra ladder, new wood, and a case of paper towels, I spent $1766.00.
Often, we will sit out and have our morning coffee on either the front or back patio, and remark, “Wow! These people sure got a nice paint job! Must have cost a fortune!” Well, not exactly.